哈囉大家好,這裡是正在回味舊新聞的小編過路君子
目前正在看「蕭明禮惡意阻擋救護車」和「賴俊吉惡意阻擋救護車」這兩事件當時的新聞。
上一篇文章我們提到了如何將 Discord 機器人從 1.7.3 更新成 2.0.1,沒看過的可以往這裡走:【Discord bot 2.0.1】如何將舊機器人升級至目前最新版本。
在那篇文章裡面我們有提到如果在 on_ready() 函數裡面少了一些設置,可能會造成 Discord 機器人在響應按鈕上失敗:
(所有圖片點擊都可以放大、變高清)
而當時小編對於 discord.ui.View 和 discord.ui.button 的介紹僅僅只有如此。
所以,今天小編來詳細的說一下該如何使用 Discord button 這個新的功能。
那麼在開始之前,小編先簡單的提一下按鈕的響應。
Discord botton 使用的響應方式是用 callback(event),那至於要如何響應,有兩種實作的方式,分別是:
- event 搭配 function 來完成響應。
- 使用 class 搭配 event 來完成響應。
小編認為對於程式管理來說第二種方式比較好,使用第一種方式的話程式碼會散落在檔案各處,所以接下來都會以介紹第二種方式為主。
Discord.ui.button 宣告
Step1. 宣告class
那我們接下來所有使用到的 class 都在 discord 裡面,所以只要開頭有寫: import discord即可正常執行。
首先我們先來寫個簡單的 class,那這個我們自己寫的 class 必須要繼承 discord.ui.View 呦。
class aButton(discord.ui.View):
    def __init__(self):
        super().__init__()
Step2. 註冊按鈕
接下來,我們會直接在這個 class 內註冊一個按鈕:
class aButton(discord.ui.View):
    def __init__(self):
        super().__init__()

    @discord.ui.button(label="confirm", emoji='\u2705', style=discord.ButtonStyle.success)
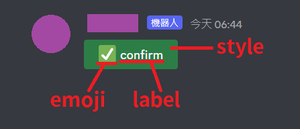
其中 button 後面括號可以設定三種屬性,分別是:
- label: 按鈕上所顯示的文字。
- emoji: 按鈕上所顯示的表情符號。
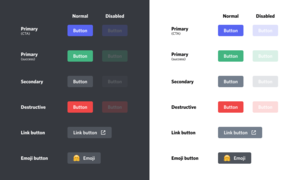
- style: 按鈕的樣式,總共有五種可選:primary, secondary, success, danger, & link(註1);實際效果可參考下圖。
圖片來源:https://guide.pycord.dev/interactions/ui-components/buttons
Step3. 加上callback
講白話一點就是當我們的按鈕被使用者點擊的時候,我們的程式需要做些什麼事情。
那使用方式也非常簡單,直接寫在下方即可。
class aButton(discord.ui.View):
    def __init__(self):
        super().__init__()

    @discord.ui.button(label="confirm", emoji='\u2705', style=discord.ButtonStyle.success)
    async def buttonEvent(self, interaction, button):
        # code here...
        pass
其中,按鈕的函數會被傳入兩個參數,而小編在這邊就不細講了,但會將它們的型態和相關的 reference 放在下方,有興趣的人可以自行查閱。
- interaction: discord.Interaction
- button: discord.ui.Button
Discord.ui.button 基本使用
發送幾顆按鈕出去
class aButton(discord.ui.View):
    def __init__(self):
        super().__init__()

    @discord.ui.button(label="confirm", emoji='\u2705', style=discord.ButtonStyle.success)
    async def buttonEvent(self, interaction, button):
        # code here...
        pass

class file(default):
    @commands.command()
    @commands.check(Permission.developer)
    async def sendButton(self, ctx):
        view = aButton()
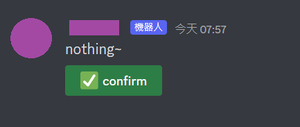
        await ctx.send(content="nothing~", view=view)

async def setup(bot):
    await bot.add_cog(file(bot))
當使用者使用機器人指令「sendButton」的時候,我們的機器人會回應一串文字和一個按鈕給該使用者。
如果要送兩顆或以上的按鈕,就只需要多打幾行 @discord.ui.button 即可,每個按鈕皆可以獨自設定,不一定要每一顆都一樣。
當然,這顆按鈕是沒有任何的功能,畢竟我們按鈕的函數還是只有放 pass 嘛!而接下來我們就會針對此區塊來修改。
修改發送的訊息內容
class aButton(discord.ui.View):
    def __init__(self):
        super().__init__()

    @discord.ui.button(label="confirm", emoji='\u2705', style=discord.ButtonStyle.success)
    async def buttonEvent(self, interaction, button):
        await interaction.response.edit_message(content="Hello world")
停用按鈕
class aButton(discord.ui.View):
    def __init__(self):
        super().__init__()

    @discord.ui.button(label="confirm", emoji='\u2705', style=discord.ButtonStyle.success)
    async def buttonEvent(self, interaction, button):
        button.disabled = True
        await interaction.response.edit_message(content="Hello world", view=button.view)
這邊比較要注意的一點就是:如果有對按鈕(視圖View)做任何的變更都要傳回客戶端(上方程式最後一行),客戶端才會更新。
所以很多人遇上了明明已經將 disabled 設為 True,但是發現不管怎麼按按鈕,程式碼都沒有生效,其實不是程式碼沒有生效,而是生效了你沒有告知客戶端。
移除按鈕
有時候我們需要使用者按下按鈕,但我們只需要顯示對應的純文字訊息,此後按鈕便再無用處。
此時,雖然我們可以直接停用按鈕,但是如果我們每按下一個按鈕便會回傳兩個按鈕,例如:請使用者選擇一個是非題,然後產生兩個按鈕給使用者答題。如果僅僅只是將按鈕停用,很快便會造成版面的紊亂。
所以,這時候我們就必須將舊的按鈕移除,以免造成版面上掛滿數十個被停用的按鈕。
class aButton(discord.ui.View):
    def __init__(self):
        super().__init__()

    @discord.ui.button(label="confirm", emoji='\u2705', style=discord.ButtonStyle.success)
    async def buttonEvent(self, interaction, button):
        button.disabled = True
        button.view.remove_item(button)
        await interaction.response.edit_message(content="Hello world", view=button.view)
不響應的按鈕
當我們想要一個啞彈,也就是按下但客戶端不會發生任何事情的按鈕,例如:向其他伺服器發送一段訊息,但我不想讓客戶端發現我偷偷送了訊息出去。
我們的直覺就是直接在函數內寫入 pass 嘛!但是當我們真正按下按鈕的時候卻顯示這樣:
正確的方式是使用 defer() 來告訴客戶端此按鈕並不會回傳任何值會對其做響應。
class aButton(discord.ui.View):
    def __init__(self):
        super().__init__()

    @discord.ui.button(label="confirm", emoji='\u2705', style=discord.ButtonStyle.success)
    async def buttonEvent(self, interaction, button):
        await interaction.response.defer()
停止監聽
只要一顆按鈕被創建出來,那我們的 Discord機器人便會持續監聽此按鈕,直至 timeout(預設為 3 分鐘)。
在一般情況之下,我們不主動停止監聽按鈕問題不大(畢竟等到它 timeout 就好了嘛),但是如果我們有手動將 timeout 取消,就會造成伺服器資源被永久占用。
除非將機器人重新啟動,否則被使用完的按鈕仍舊會繼續占用伺服器資源,無法釋出給下一個人使用。
class aButton(discord.ui.View):
    def __init__(self):
        super().__init__()

    @discord.ui.button(label="confirm", emoji='\u2705', style=discord.ButtonStyle.success)
    async def buttonEvent(self, interaction, button):
        button.view.stop()
        await interaction.response.edit_message(content="Hello world", view=view)
使用這種方式要非常注意,如果同時有兩個及以上的按鈕,會一同被停止監聽。
後記
上文小編有提到按鈕的樣式總共有五個,但是明明就有人寫了那五個 style 以外的呀!
那其實只是該名稱的別名,其效果是一樣的,小編在此當成附錄羅列出給各位。
| 樣式名稱 | 別名 |
| primary | blurple |
| secondary | grey, gray |
| success | green |
| danger | red |
| link | url |
至於誰是樣式名稱、誰是別名,不是小編自己覺得,而是根據官方的Reference所整理出來的。


