
大家好,這裡是正在重新梳理頭緒的小編過路君子
之前有曾經寫過如何使用 Maven來部屬 War檔到 Wildfly裡面,不知道大家是否還記得?
承如開頭所述,那篇文章在這裡: 【Maven】用Maven來託管Wildfly/jBoss的部屬(deploy)、解部屬(undeploy)@小編過路君子。
算是篇超級極簡版介紹,沒有任何的解釋,只有一堆的設定檔和一個用手畫出來的目錄結構,這篇僅把上方那篇 war檔的打包切割出來。
那如果各位只是單純需要用 Maven將專案打包成可執行的 jar檔的話,可以參考這篇: 【Maven】如何創建一個簡單可執行的JAR檔@小編過路君子
那麼,既然是 Maven那當然要先上的就是目錄結構啦。
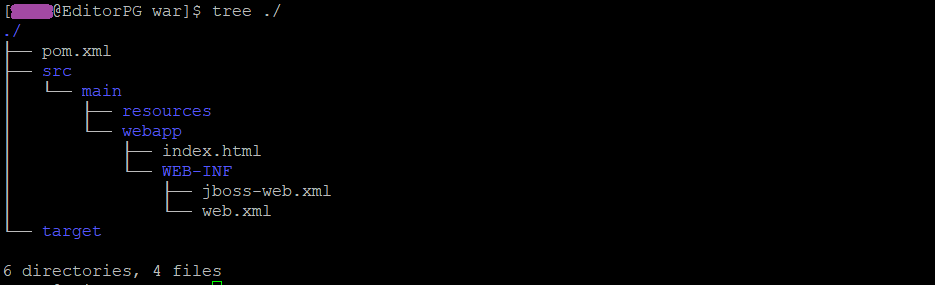
(所有圖片點擊都可以放大、變高清)
那需要由我們設定的檔案總共有四個,也就是上圖中的四個白色字的檔案。
那我們就一個檔案一個檔案來吧,首先是 jboss-web.xml檔案:
<jboss-web>
    <context-root>/</context-root>
</jboss-web>
然後是 web.xml:
<web-app xmlns="http://xmlns.jcp.org/xml/ns/javaee"
         xmlns:xsi="http://www.w3.org/2001/XMLSchema-instance"
         xsi:schemaLocation="http://xmlns.jcp.org/xml/ns/javaee
         http://xmlns.jcp.org/xml/ns/javaee/web-app_3_1.xsd"
         version="3.1">
    <servlet>
        <servlet-name>index</servlet-name>
        <jsp-file>index.jsp</jsp-file>
    </servlet>

    <welcome-file-list>
        <welcome-file>index.html</welcome-file>
    </welcome-file-list>

    <servlet-mapping>
        <servlet-name>register</servlet-name>
        <url-pattern>/register/*</url-pattern>
    </servlet-mapping>
</web-app>
接著就是 index.html的檔案內容:
<!DOCTYPE html>
<html>
<head>
    <meta charset="utf-8">
    <title>Index</title>
</head>

<body>
    <h1>Hello World!</h1>
</body>
</html>
最後就是我們的主角啦,我們的 pom.xml:
<project xmlns="http://maven.apache.org/POM/4.0.0" xmlns:xsi="http://www.w3.org/2001/XMLSchema-instance"
     xsi:schemaLocation="http://maven.apache.org/POM/4.0.0 http://maven.apache.org/maven-v4_0_0.xsd">
<modelVersion>4.0.0</modelVersion>

	<groupId>passing.editor.guild245</groupId>
	<artifactId>pixiJS-web</artifactId>
	<version>1.0.0</version>

	<name>pixiJS-web Maven Webapp</name>
	<url>http://maven.apache.org</url>

	<properties>
		<project.build.sourceEncoding>UTF-8</project.build.sourceEncoding>
		<maven.compiler.source>1.8</maven.compiler.source>
		<maven.compiler.target>1.8</maven.compiler.target>
	</properties>

	<dependencies>
		<dependency>
			<groupId>junit</groupId>
			<artifactId>junit</artifactId>
			<version>4.11</version>
			<scope>test</scope>
		</dependency>
	</dependencies>

	<packaging>war</packaging>

	<build>
		<pluginManagement>
			<plugins>
				<plugin>
					<groupId>org.apache.maven.plugins</groupId>
					<artifactId>maven-war-plugin</artifactId>
					<version>3.3.1</version>
				</plugin>
				<plugin>
					<artifactId>maven-clean-plugin</artifactId>
					<version>3.1.0</version>
				</plugin>
				<plugin>
					<artifactId>maven-resources-plugin</artifactId>
					<version>3.0.2</version>
				</plugin>
				<plugin>
					<artifactId>maven-surefire-plugin</artifactId>
					<version>2.22.1</version>
				</plugin>
				<plugin>
					<artifactId>maven-install-plugin</artifactId>
					<version>2.5.2</version>
				</plugin>
				<plugin>
					<artifactId>maven-deploy-plugin</artifactId>
					<version>2.8.2</version>
				</plugin>
				<plugin>
					<artifactId>maven-site-plugin</artifactId>
					<version>3.7.1</version>
				</plugin>
				<plugin>
					<artifactId>maven-project-info-reports-plugin</artifactId>
					<version>3.0.0</version>
				</plugin>
			</plugins>
		</pluginManagement>
	</build>
</project>
最後只要將整個 Maven專案打包就好囉~
| Linux | mvn package |
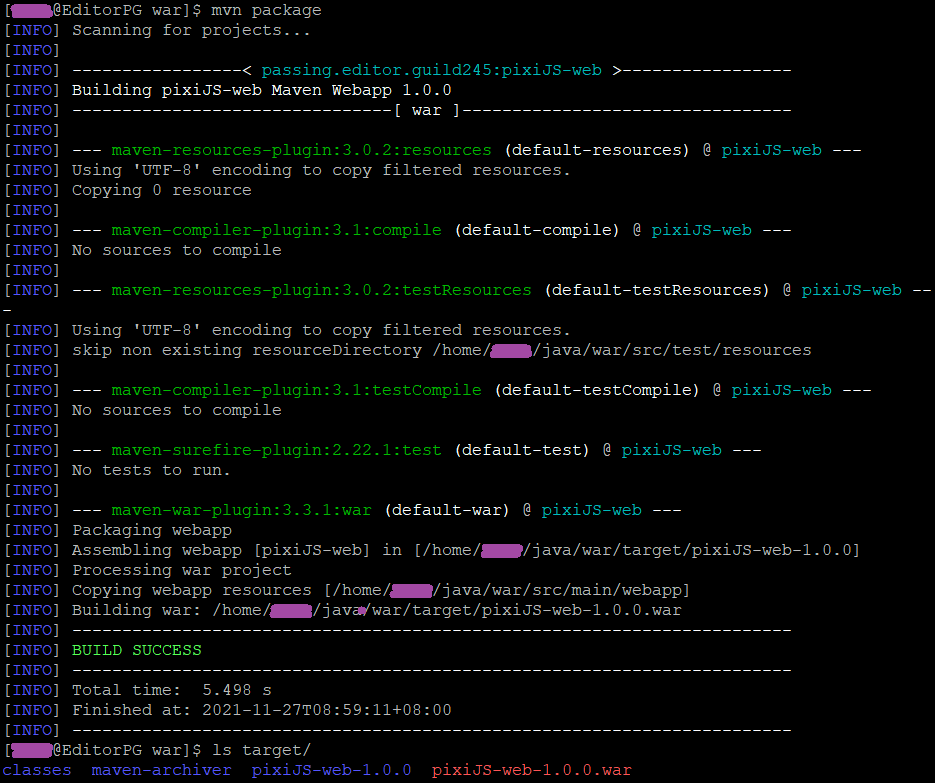
這時就可以看到我們的 War檔躺在資料夾裡面啦~剩下的要怎麼料理就是各位的需求了。
後記
小編昨天發布完如何打包成可執行的 Jar檔那篇文章之後就上床睡覺了,睡著睡著突然想到,為何不把如何打包成 War檔的文章也發布一下,雖然就寫在那篇介紹 Wildfly部屬的文章裡面,但想想每次要用都要重新切一次就好麻煩。