
大家好,這裡是正在讀寫資料庫的小編過路君子
好不容易架好了資料庫,那第一件事情當然是......對!上來發個文
Nexus Repository Manager 的安裝在網路上各處已經有許許多多的人對此著墨了。
所以小編在此不提及如何安裝,僅筆記如何設定權限讓他人「只」可以將寫好的 jar 包上傳至資料庫。
順帶一提,小編所架設的 Maven Repository 是全世界都能連線,但是必須要擁有帳號和密碼才能對其做存取,所以相對的會附上完整的 setting.xml 和 pom.xml 供各位參考。
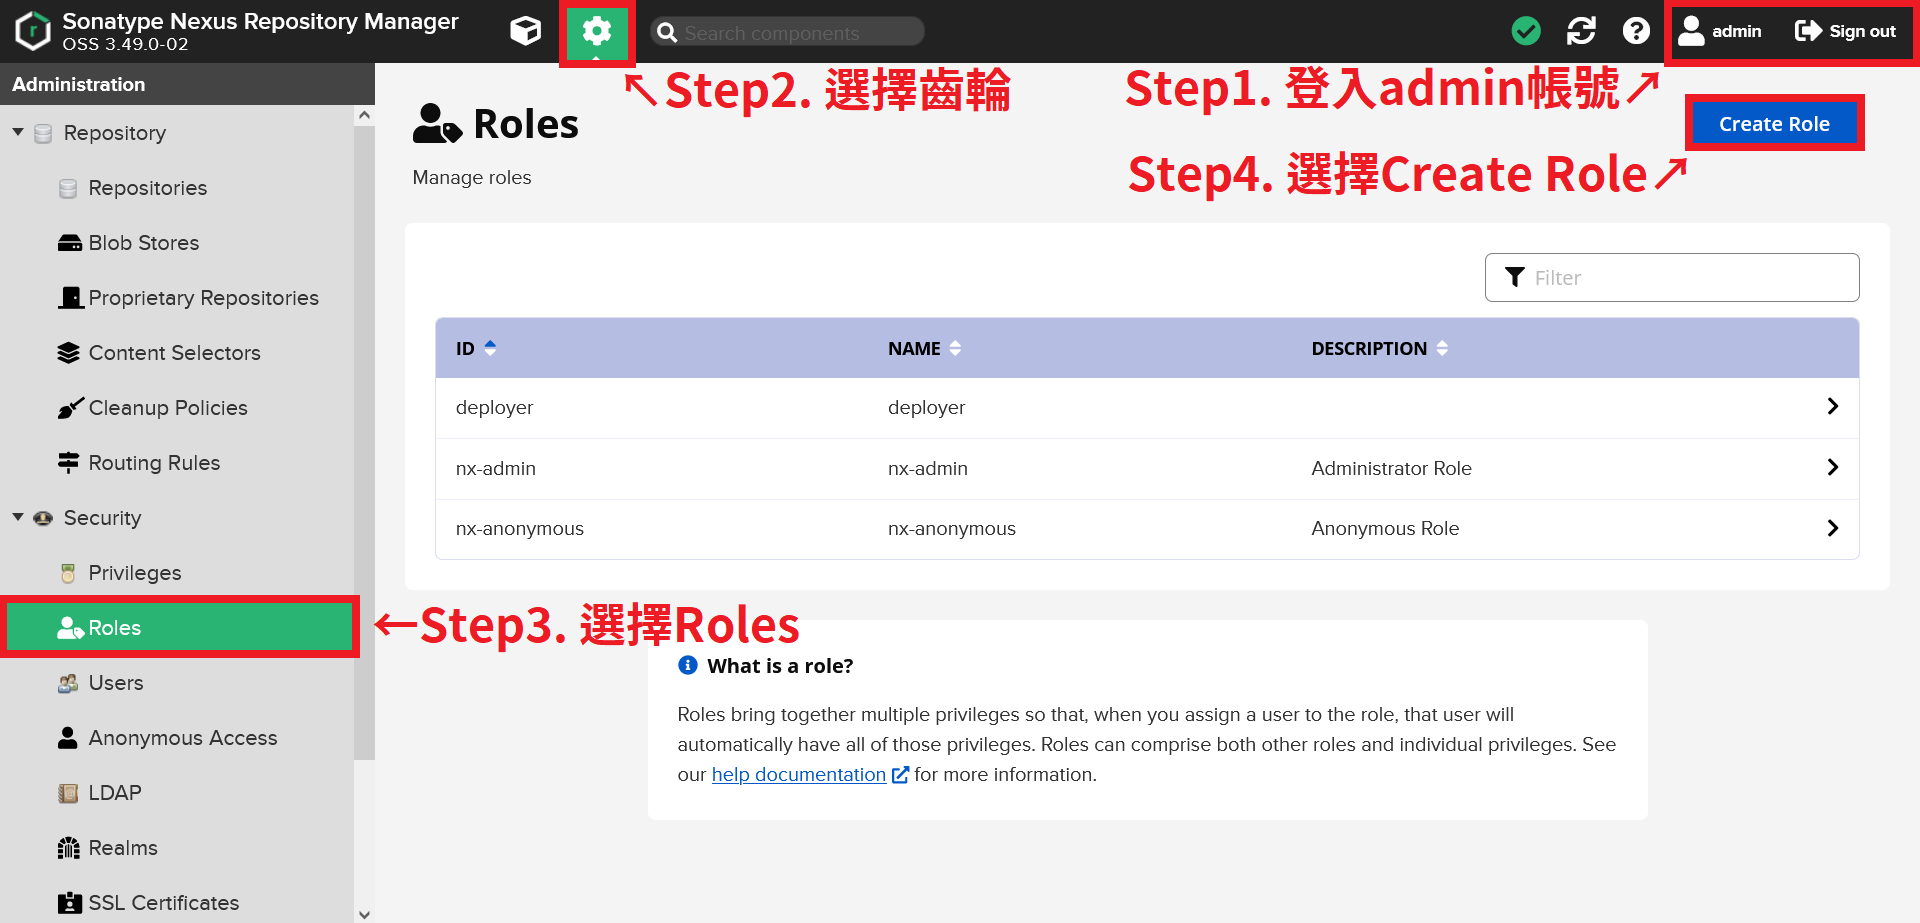
首先,我們先連線到 Nexus Repository Manager 的管理頁面並登入 admin 的帳號。
(所有圖片點擊都可以放大、變高清)
在新增角色的時候我們僅需簡單設置兩個屬性:名稱和權限。
名稱相對好理解,就依照各自的喜好或是習慣叫就好。

而我們總共需要新增的權限為以下四個:
nx-repository-view-*-*-add
nx-repository-view-*-*-edit
nx-repository-view-*-*-read
nx-repository-view-*-*-browse
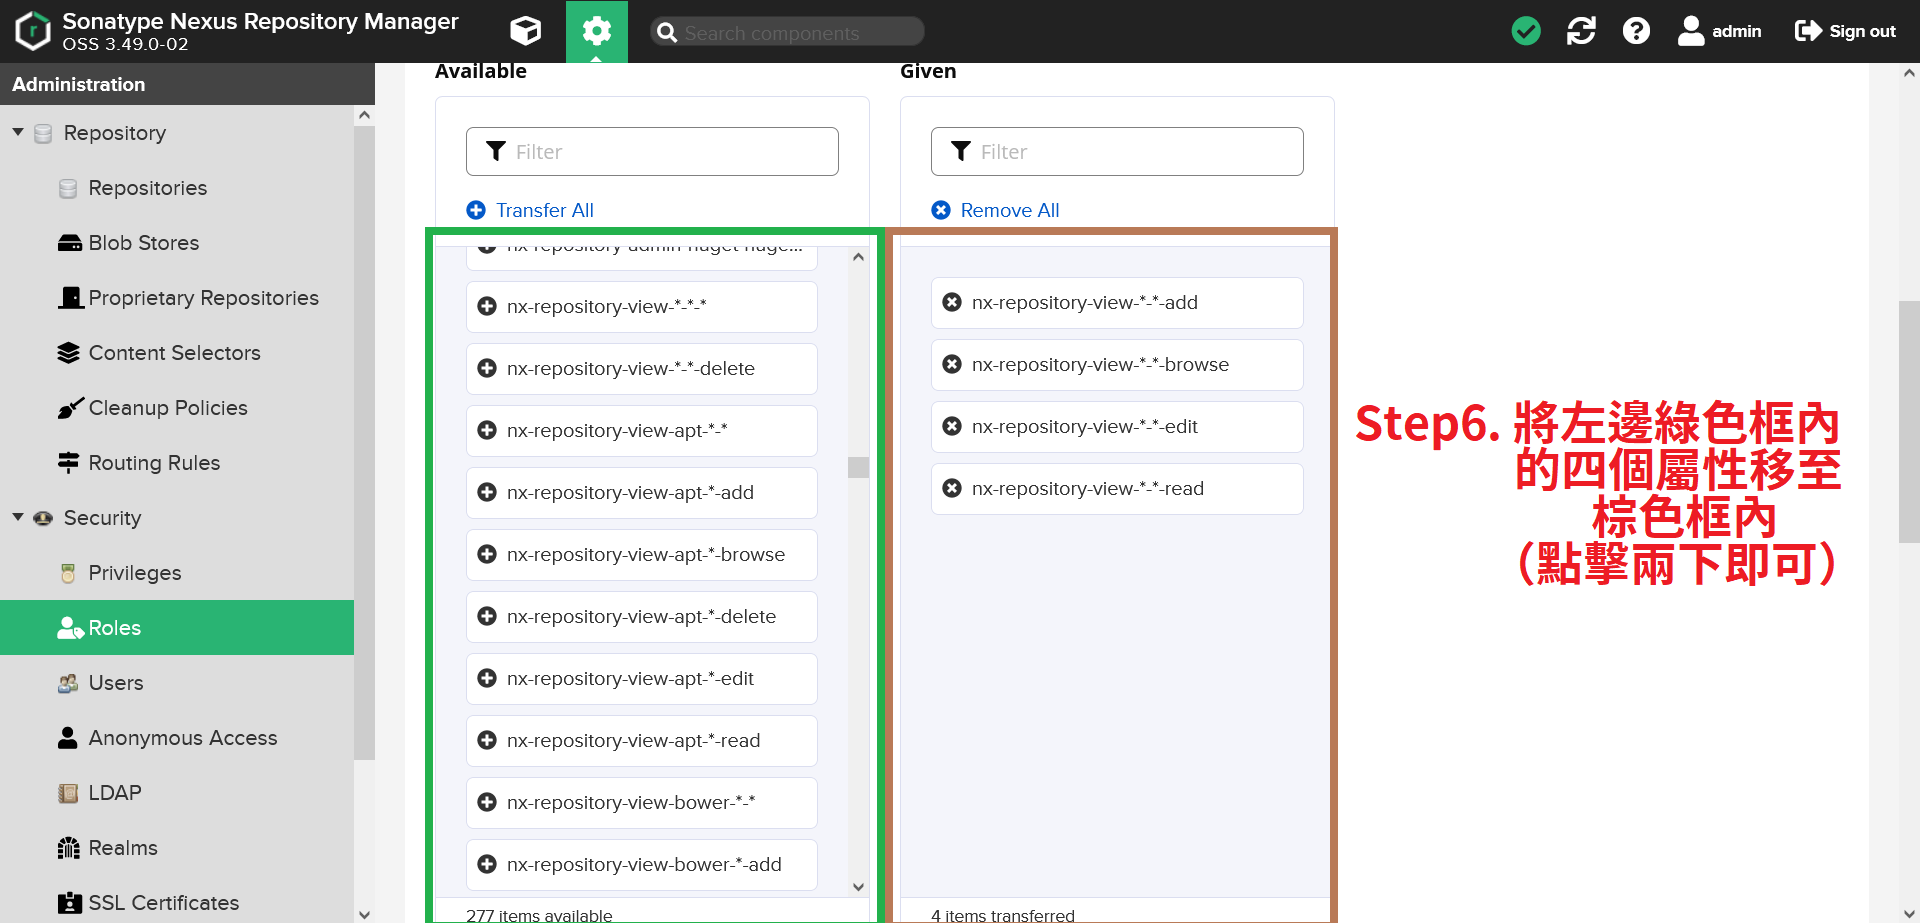
其中的 nx-repository-view-*-*-browse 可有可無。
如果沒有給予,仍就可以透過 Maven 來部署(deploy)我們的 jar 包到遠端資料庫,只是就不能透過瀏覽器直接連線到資料庫內查看目前有哪些 jar 包可用。
如果細心點的人就會發現,基本上唯獨 nx-repository-view-*-*-delete 的權限之外小編都給了。
如果此權限不給的話就只能上傳 jar 包而已,無法對已經上傳的 jar 包進行刪除,各位可以依照自己目前所需斟酌給予。
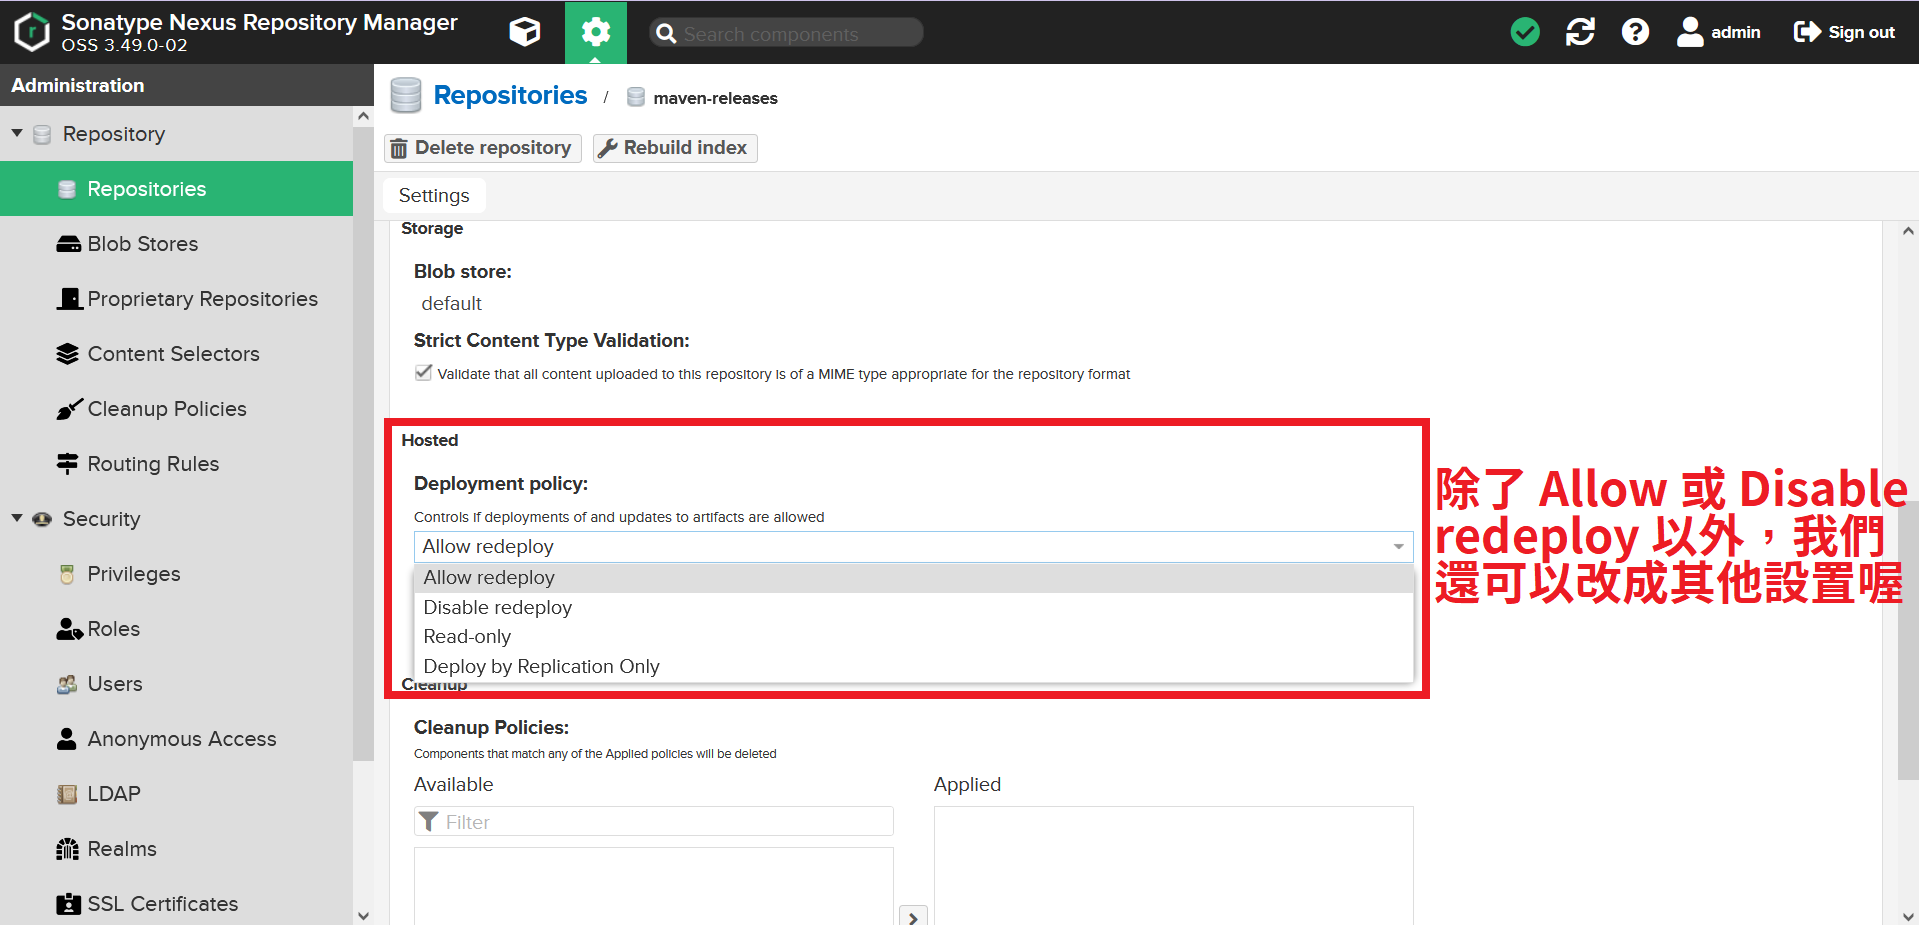
我們的資料庫預設會阻擋重複上傳的 jar 包,所謂的重複上傳就是 groupId 和 artifactId 還有 version 所對應的路徑已經有檔案的存在了。
所以使用者如果沒有刪除的權限,那不小心上傳錯 jar 包是無法刪除重傳或是強制覆蓋的,只能將版本號改動並再次上傳了。
如果想要允許使用者能覆蓋已經存在的檔案,可以透過下列的方式來修改:

進入將頁面往下滾動,找到 Hosted → Deployment policy 選擇「Allow redeploy」即可。
然後將此角色給予我們現有的使用者即可:
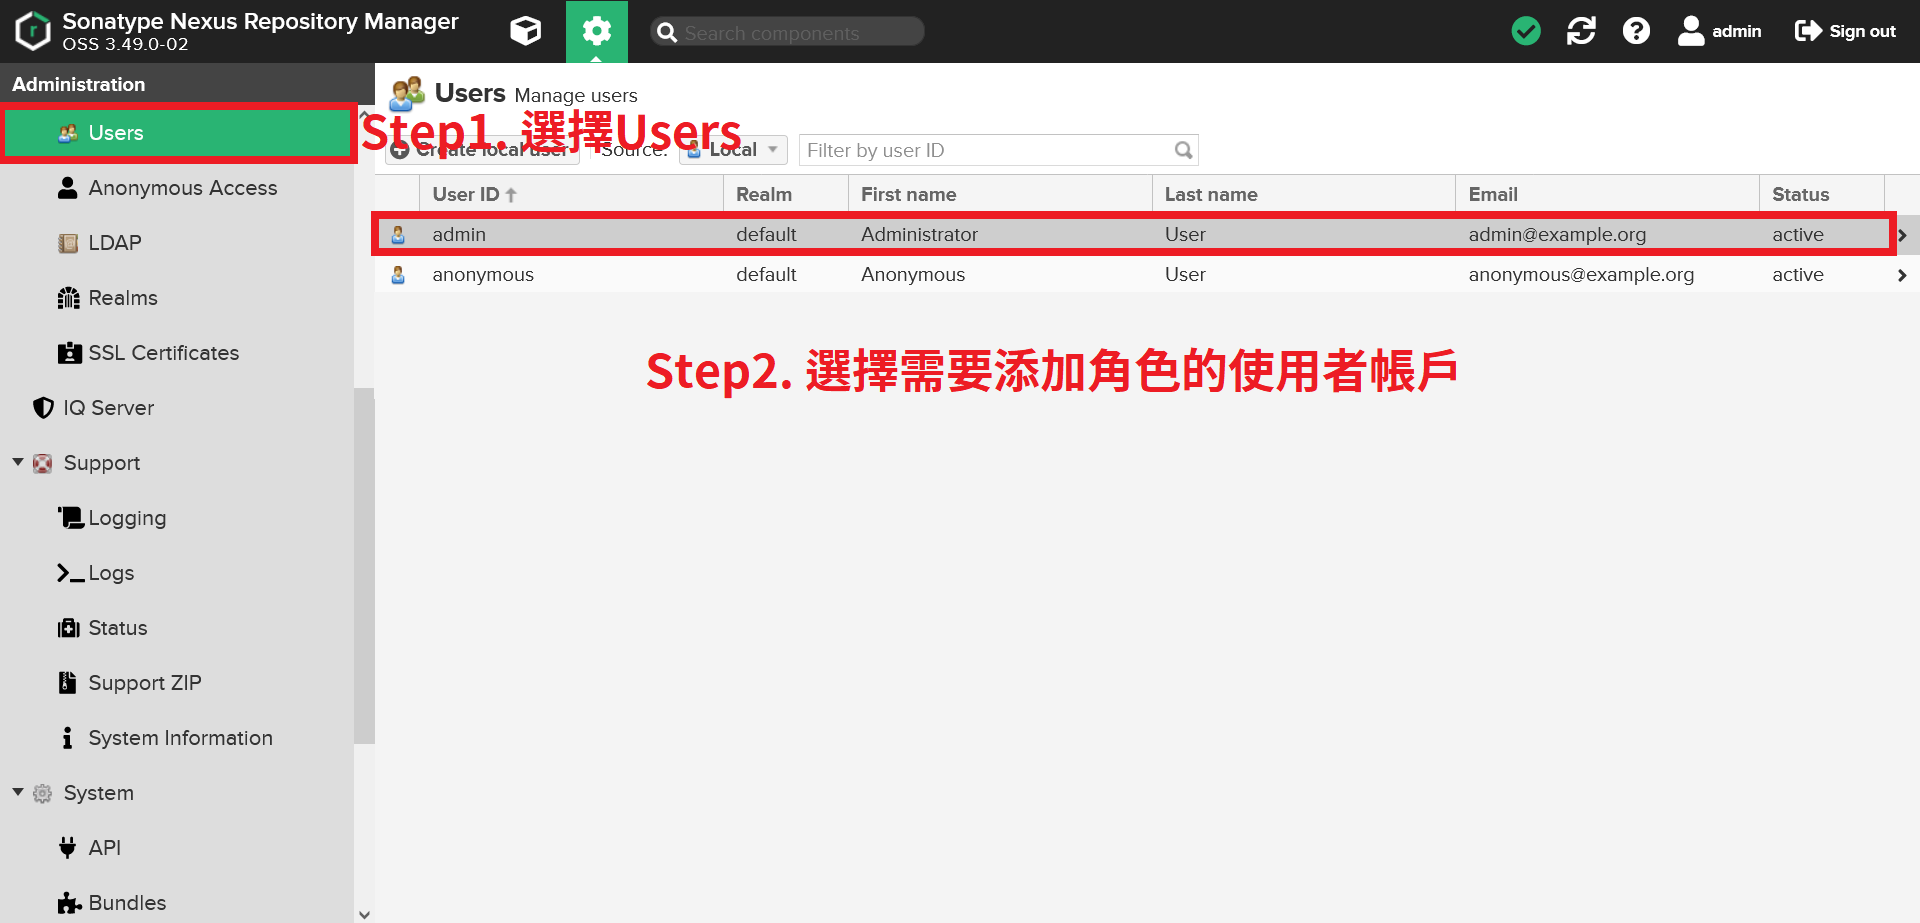
同樣往下滑,找到 Roles 區塊,將剛剛創建的身分組從左邊移動到右邊。
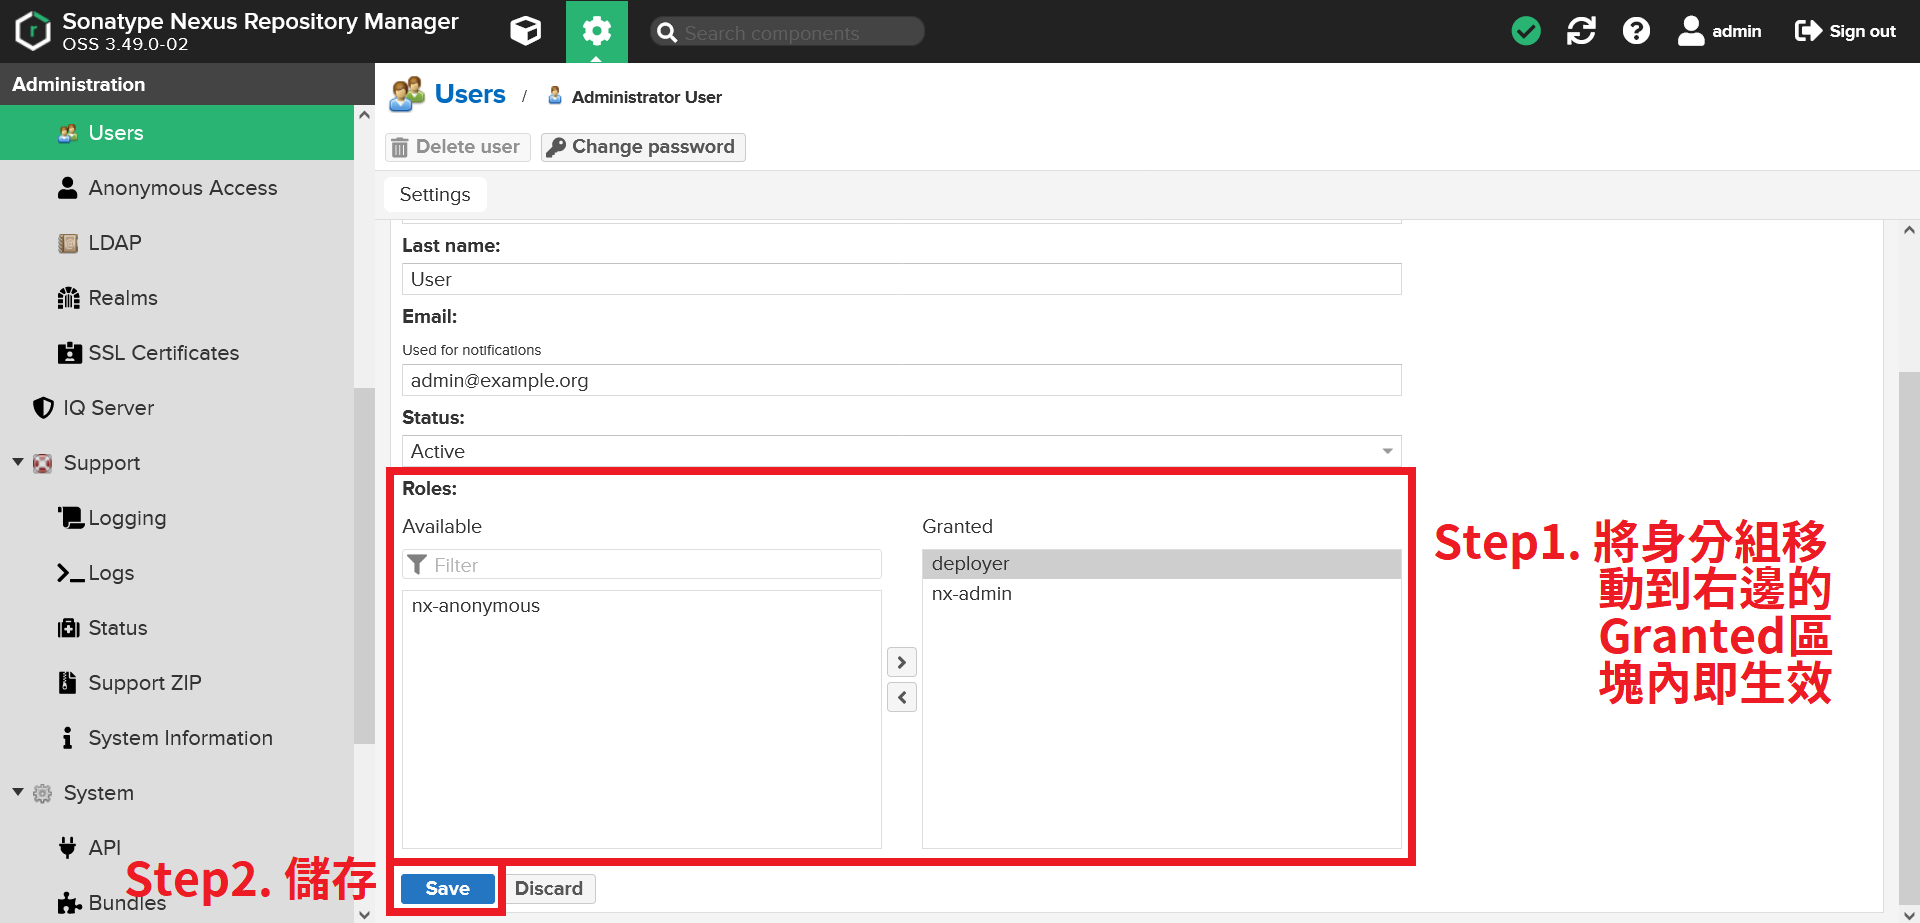
這樣,這位使用者就可以對我們的 Maven Repository 進行 jar 檔的部署囉!
接下來小編就在這快速地丟出 setting.xml 和 pom.xml 這兩個檔案。
<!-- setting.xml -->

<settings xmlns="http://maven.apache.org/SETTINGS/1.0.0"
  xmlns:xsi="http://www.w3.org/2001/XMLSchema-instance"
  xsi:schemaLocation="http://maven.apache.org/SETTINGS/1.0.0
                      https://maven.apache.org/xsd/settings-1.0.0.xsd">;
  <localRepository>/usr/share/maven/ref/repository</localRepository>

  <servers>
    <server>
      <id>maven-public</id>
      <username>username</username>
      <password>password</password>
    </server>

    <server>
      <id>maven-releases</id>
      <username>username</username>
      <password>password</password>
    </server>

    <server>
      <id>maven-snapshots</id>
      <username>username</username>
      <password>password</password>
    </server>
  </servers>

  <mirrors>
    <mirror>
      <id>maven-public</id>
      <name>maven-public</name>

      <url>http://127.0.0.1:8080/repository/maven-public/</url>
      <mirrorOf>*</mirrorOf>
      <updatePolicy>always</updatePolicy>
    </mirror>
  </mirrors>
</settings>
小編在設定 mirrors 上吃了很大的悶虧,因為目前網路上常見的版本都僅有設置 maven-releases 庫和 maven-snapshots 庫的登入資訊。
反而對於我們要拉檔案的 maven-public 庫沒有設置任何的資訊,所以一旦執行就會吃到以下的錯誤:
接下來就是 pom.xml 的設定了:
<!-- pom.xml -->

<project xmlns="http://maven.apache.org/POM/4.0.0" xmlns:xsi="http://www.w3.org/2001/XMLSchema-instance"
     xsi:schemaLocation="http://maven.apache.org/POM/4.0.0 http://maven.apache.org/maven-v4_0_0.xsd">;
    <modelVersion>4.0.0</modelVersion>

    <groupId>please.fix.here</groupId>
    <artifactId>yourRepo</artifactId>
    <version>0.0.0</version>

    <packaging>jar</packaging>

    <properties>
        <project.build.sourceEncoding>UTF-8</project.build.sourceEncoding>
        <maven.compiler.source>1.8</maven.compiler.source>
        <maven.compiler.target>1.8</maven.compiler.target>
    </properties>

    <distributionManagement>
        <repository>
            <id>maven-releases</id>
            <name>User Porject Release</name>
            <url>http://127.0.0.1:8080/repository/maven-releases/</url>
        </repository>

        <snapshotRepository>
            <id>maven-snapshots</id>
            <name>User Porject Snapshot</name>
            <url>http://127.0.0.1:8080/repository/maven-snapshots/</url>
        </snapshotRepository>
    </distributionManagement>

    <repositories>
        <repository>
            <id>maven-public</id>
            <name>Nexus Repository</name>
            <url>http://127.0.0.1:8080/repository/maven-public/</url>
            <releases>
                <enabled>true</enabled>
            </releases>
            <snapshots>
                <enabled>true</enabled>
            </snapshots>
        </repository>
    </repositories>

    <dependencies>
    </dependencies>

    <build>
        <resources>
            <resource>
                <directory>src/main/java/</directory>
                <filtering>false</filtering>
                <includes>
                    <include>**</include>
                </includes>
                <excludes>
                    <exclude>**/*.java</exclude>
                </excludes>
            </resource>
        </resources>

        <pluginManagement>
            <plugins>
                <plugin>
                    <groupId>org.apache.maven.plugins</groupId>
                    <artifactId>maven-war-plugin</artifactId>
                    <version>3.3.1</version>
                </plugin>
                <plugin>
                    <artifactId>maven-clean-plugin</artifactId>
                    <version>3.1.0</version>
                </plugin>
                <plugin>
                    <artifactId>maven-resources-plugin</artifactId>
                    <version>3.0.2</version>
                </plugin>
                <plugin>
                    <artifactId>maven-surefire-plugin</artifactId>
                    <version>2.22.1</version>
                </plugin>
                <plugin>
                    <artifactId>maven-install-plugin</artifactId>
                    <version>2.5.2</version>
                </plugin>
                <plugin>
                    <artifactId>maven-deploy-plugin</artifactId>
                    <version>2.8.2</version>
                </plugin>
                <plugin>
                    <artifactId>maven-site-plugin</artifactId>
                    <version>3.7.1</version>
                </plugin>
                <plugin>
                    <artifactId>maven-project-info-reports-plugin</artifactId>
                    <version>3.0.0</version>
                </plugin>
                    <plugin>
                    <artifactId>maven-project-info-reports-plugin</artifactId>
                    <version>3.0.0</version>
                </plugin>
            </plugins>
        </pluginManagement>
    </build>
</project>
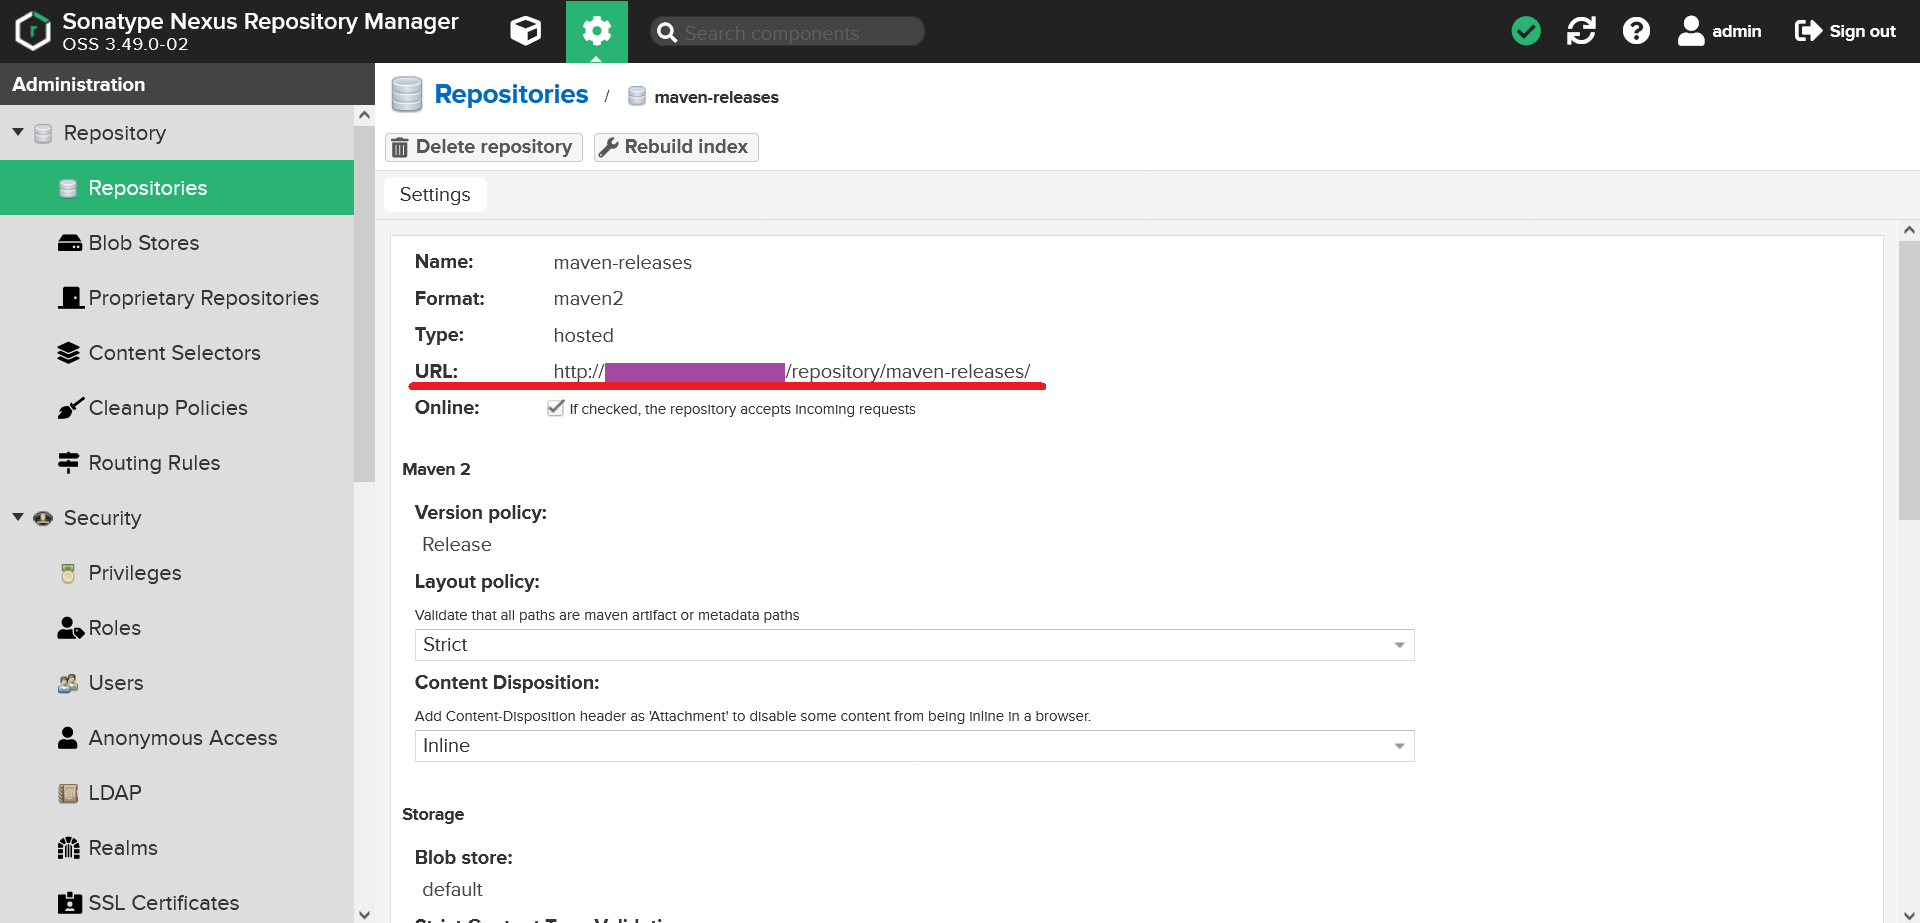
話說,其實資料庫的連線網址 Nexus Repository Manager 都已經有幫我們寫出來了。
後記
安裝好之後小編有試著 deploy 一個 jar 包到那個資料庫裡面,然後再跑去開一台乾淨的電腦,照著上面的那兩個檔案再次設定一次。
在經過一番琢磨 import 資訊該如何打之後,總算成功將位於小編私架的 Maven Repository 上的 jar 包執行起來啦!
