大家好,這裡是因為感覺有趣所以不小心產生出這玩意的小編過路君子
但也花了不少時間在這東西上面,最後的 --add-opens問題沒能解決,就...留給其他高手來解答吧
那這篇所使用的概念的基底就是這篇: 【Maven】如何創建一個簡單可執行的JAR檔@小編過路君子。
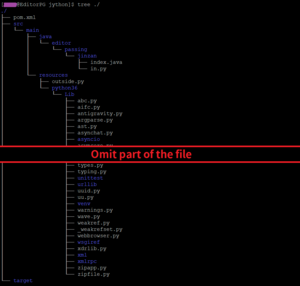
基本上就是對 pom.xml做一點「小小的」改動,那我們照慣例,直接就先上目錄結構吧。
(所有圖片點擊都可以放大、變高清)
可以發現目錄結構突然變得又臭又長,那是因為我們將整個 python的 Lib都搬進來了。
雖然現在暫時還用不到,但是之後開始撰寫 python的時候可能會要 "import time"之類的,那平時我們在執行 python的時候,編譯器會自動去我們 python所在的目錄下面找尋我們所 import進來的東西。
但今天我們不但是用 java來呼叫並執行 python,還打包成了 jar檔準備丟給別人,撇開對方伺服器裡面沒有 python的問題,我們根本不知道對方 python所在的目錄在哪裡!所以必須手動夾帶進去 jar檔裡面。
那這裡有一個要特別注意的點,除非有特別設定過 Maven,否則我們之後撰寫的所有 .py檔案都必須放在 resources下,要不然 Maven不會將其打包進去 jar檔裡面。
至於 outside.py和 in.py可以先忽略,這是小編另外一篇(【Maven / Jython】如何在JAVA裡import其他python檔案和新增資源路徑)在講如何導入自行撰寫的 .py檔案所會用到的素材,在這邊用不到。
那現在我們就是要先找出 python的 lib在哪裡。
| Linux | whereis python |

以小編來說,小編的 python所在的目錄在 /usr/lib64/python3.6/下,所以小編就將這個目錄下的所有檔案複製到 ./src/main/resources/python3.6/Lib/下。
| Linux | mkdir -p ./src/main/resources/python3.6/Lib/ cp -r /usr/lib64/python3.6/* ./src/main/resources/python3.6/Lib/ |
※注意檔案權限,如果檔案權限為 "-rw-r--r--. 1 root root"之類的,記得要更改檔案的擁有者。
這邊有一點要非常注意,就是目錄路徑最後一定要以 Lib/做結尾,這是因為等等我們在設置 python.home的時候,系統會自動加上 Lib/,所以如果我們沒有以 Lib/結尾照樣找不到。
畢竟我們基底還是 java,在使用 python預設某些函式庫的時候還是會出問題,例如:os, asyncio等等,不過問題不大,這些基本上 java都有相對應的函式庫可以取代;下面為 import os的時候所引發的錯誤。
Exception: org.python.core.PySyntaxError thrown from the UncaughtExceptionHandler in thread "main"
將所有檔案複製完成後,就可以來添加 index.java的內容囉。
其中第 22行的 python.home如果各位有去查其他人所整理的資料應該會發現常常就只寫了一行 "path to the Lib folder",當初小編也是搞了很久才弄清楚這東西要怎麼設定,所以才會特別拉出來講。
那根據小編剛剛上面的設置 python的家目錄在 ./src/main/resources/python3.6/下,所以我們就將那串寫入就可以了,程式在執行的時候實際會去 ./src/main/resources/python3.6/Lib下找尋我們所 import的檔案。
1 2 3 4 5 6 7 8 9 10 11 12 13 14 15 16 17 18 19 20 21 22 23 24 25 |
package editor.passing.jinzan; import java.util.*; import org.python.util.PythonInterpreter; public class index { public static void main(String[] args) { jythonInit(); PythonInterpreter python = new PythonInterpreter(); python.exec("print('Hello World!')"); } private static void jythonInit() { Properties init = new Properties(); init.put("python.home", "./src/main/resources/python36/"); init.put("python.console.encoding", "UTF-8"); init.put("python.security.respectJavaAccessibility", "false"); init.put("python.import.site", "false"); PythonInterpreter.initialize(System.getProperties(), init, new String[0]); } } |
可以感覺到光是 index.java就長大了不少,雖然和介紹如何打包成 Jar檔案那篇執行完全一樣的功能,在螢幕上顯示「Hello World!」。
pom.xml 基本上只加了 dependency和對 maven-shade-plugin的 <configuration>標籤裡做變動而已,其他的部分都一樣。
對了,實際上 <filters></filters> 這個標籤可以不用加,不會影響最終 Jar檔案的執行,但是會跳出一堆警告,如果覺得顯示警告也沒關係的話,可以把這個標籤連同子標籤一起拔掉。
1 2 3 4 5 6 7 8 9 10 11 12 13 14 15 16 17 18 19 20 21 22 23 24 25 26 27 28 29 30 31 32 33 34 35 36 37 38 39 40 41 42 43 44 45 46 47 48 49 50 51 52 53 54 55 56 57 58 59 60 61 62 63 64 65 66 67 68 69 70 71 72 73 74 75 76 77 78 79 80 81 82 83 84 85 86 87 88 89 90 91 92 93 94 95 96 97 98 99 100 101 102 103 104 105 106 |
<project xmlns="http://maven.apache.org/POM/4.0.0" xmlns:xsi="http://www.w3.org/2001/XMLSchema-instance" xsi:schemaLocation="http://maven.apache.org/POM/4.0.0 http://maven.apache.org/maven-v4_0_0.xsd";;;;;;;;;;;;;> <modelVersion>4.0.0</modelVersion> <groupId>editor.passing.jinzan</groupId> <artifactId>packageJAR</artifactId> <version>1.0.0</version> <name>pixiJS-web Maven Webapp</name> <url>http://maven.apache.org</url> <packaging>jar</packaging> <properties> <project.build.sourceEncoding>UTF-8</project.build.sourceEncoding> <maven.compiler.source>1.8</maven.compiler.source> <maven.compiler.target>1.8</maven.compiler.target> </properties> <dependencies> <dependency> <groupId>junit</groupId> <artifactId>junit</artifactId> <version>4.11</version> <scope>test</scope> </dependency> <dependency> <groupId>org.python</groupId> <artifactId>jython</artifactId> <version>2.7.2</version> </dependency> </dependencies> <build> <plugins> <plugin> <groupId>org.apache.maven.plugins</groupId> <artifactId>maven-shade-plugin</artifactId> <version>3.2.4</version> <executions> <execution> <phase>package</phase> <goals> <goal>shade</goal> </goals> <configuration> <transformers> <transformer implementation="org.apache.maven.plugins.shade.resource.ManifestResourceTransformer"> <mainClass>editor.passing.jinzan.index</mainClass> </transformer> </transformers> <filters> <filter> <artifact>*:*</artifact> <excludes> <exclude>module-info.class</exclude> <exclude>META-INF/*.MF</exclude> </excludes> </filter> </filters> <createDependencyReducedPom>false</createDependencyReducedPom> </configuration> </execution> </executions> </plugin> <plugin> <artifactId>maven-clean-plugin</artifactId> <version>3.1.0</version> </plugin> <plugin> <artifactId>maven-resources-plugin</artifactId> <version>3.0.2</version> </plugin> <plugin> <artifactId>maven-surefire-plugin</artifactId> <version>2.22.1</version> </plugin> <plugin> <artifactId>maven-install-plugin</artifactId> <version>2.5.2</version> </plugin> <plugin> <artifactId>maven-deploy-plugin</artifactId> <version>2.8.2</version> </plugin> <plugin> <artifactId>maven-site-plugin</artifactId> <version>3.7.1</version> </plugin> <plugin> <groupId>org.apache.maven.plugins</groupId> <artifactId>maven-compiler-plugin</artifactId> <version>3.8.1</version> </plugin> </plugins> </build> </project> |
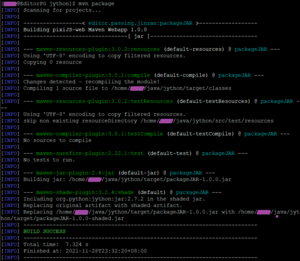
然後接著做一個簡單的打包動作。
| Linux | mvn package |
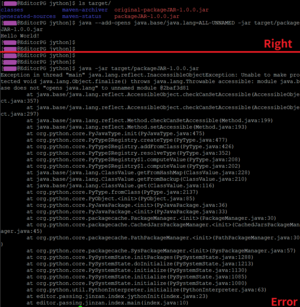
打包好的 Jar檔依舊躺在 tar裡面,但是,這一次不同的是,只單純加上 -jar來執行還是會出錯。
要再多加上一個 --add-opens才可以正確執行 Jar檔。
| Linux | java --add-opens java.base/java.lang=ALL-UNNAMED -jar target/packageJAR-1.0.0.jar |
後記
小編會想要建立一個這麼麻煩的 Jar檔很大一部分原因是要拿來做實驗,小編可不想每次打包成 War檔之後還要進行 deploy的動作,雖然好像在 Maven下都是一個指令解決......
現在就是祈禱之後小編要寫的程式能成功用 Jar檔執行起來,如果有成功應該也會發一篇文章,會把前幾篇提到的大部分內容混合起來。


