
哈囉大家好,這裡是這次絕對要記錄下來的小編過路君子
上次使用的時候沒有記錄下來,結果又花了一些時間拼回來,這次好好地寫下來吧。
這次要介紹的方式是一行一行的去讀取文件,畢竟如果一個一個字元在那邊讀取。
小檔案是無妨,但是當今天檔案大到有幾百萬個字母的時候,就要花非常多的時間在讀取上面,跟下面要介紹的方式比慢超級多。
照慣例,一樣附上目錄結構:
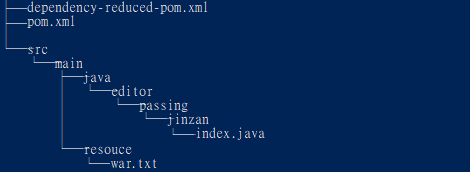
(所有圖片點擊都可以放大、變高清)
然後是 pom.xml 的設定:
這次是採用打包成一個可以直接執行的 Jar 檔,換句話說只要直接執行 target/packageJAR-1.0.0.jar 即可看到結果。
這邊最重要的就是第 25 行,如果不是放在 resouce 資料夾下,那這行也要改成相對應的資料夾。
<project xmlns="http://maven.apache.org/POM/4.0.0" xmlns:xsi="http://www.w3.org/2001/XMLSchema-instance"
     xsi:schemaLocation="http://maven.apache.org/POM/4.0.0 http://maven.apache.org/maven-v4_0_0.xsd">
    <modelVersion>4.0.0</modelVersion>

    <groupId>editor.passing.jinzan</groupId>
    <artifactId>packageJAR</artifactId>
    <version>1.0.0</version>

    <name>pixiJS-web Maven Webapp</name>
    <url>http://maven.apache.org</url>

    <packaging>jar</packaging>

    <properties>
        <project.build.sourceEncoding>UTF-8</project.build.sourceEncoding>
        <maven.compiler.source>1.8</maven.compiler.source>
        <maven.compiler.target>1.8</maven.compiler.target>
    </properties>

    <dependencies></dependencies>

    <build>
        <resources>
            <resource>
                <directory>src/main/resouce/</directory>
                <filtering>false</filtering>
                <includes>
                    <include>**</include>
                </includes>
            </resource>
        </resources>
        <plugins>
            <plugin>
                <groupId>org.apache.maven.plugins</groupId>
                <artifactId>maven-shade-plugin</artifactId>
                <version>3.2.4</version>
                <executions>
                    <execution>
                        <phase>package</phase>
                        <goals>
                            <goal>shade</goal>
                        </goals>
                        <configuration>
                            <transformers>
                                <transformer implementation="org.apache.maven.plugins.shade.resource.ManifestResourceTransformer">
                                    <mainClass>editor.passing.jinzan.index</mainClass>
                                </transformer>
                            </transformers>
                        </configuration>
                    </execution>
                </executions>
            </plugin>

            <plugin>
                <artifactId>maven-clean-plugin</artifactId>
                <version>3.1.0</version>
            </plugin>

            <plugin>
                <artifactId>maven-resources-plugin</artifactId>
                <version>3.0.2</version>
            </plugin>
            <plugin>
                <artifactId>maven-surefire-plugin</artifactId>
                <version>2.22.1</version>
            </plugin>
            <plugin>
                <artifactId>maven-install-plugin</artifactId>
                <version>2.5.2</version>
            </plugin>
            <plugin>
                <artifactId>maven-deploy-plugin</artifactId>
                <version>2.8.2</version>
            </plugin>
            <plugin>
                <artifactId>maven-site-plugin</artifactId>
                <version>3.7.1</version>
            </plugin>
            <plugin>
                <artifactId>maven-project-info-reports-plugin</artifactId>
                <version>3.0.0</version>
            </plugin>
        </plugins>
    </build>
</project>
接著是 index.java 的程式碼:
同樣的第 14 行要換成對應的檔案路徑,如果真的不知道路徑為何,可以直接先打包一個 Jar 檔,然後參照下面的做法。
import java.io.InputStream;
import java.lang.ClassLoader;
import java.io.BufferedReader;
import java.io.InputStreamReader;

public class index
{
    public static void main(String[] args)
	{
		try
		{
			ClassLoader classloader = Thread.currentThread().getContextClassLoader();

			InputStream file = classloader.getResourceAsStream("war.txt");

			BufferedReader reader = new BufferedReader(new InputStreamReader(file));

			String line;
			while((line = reader.readLine()) != null) System.out.println(line);
		}
		catch(Exception error) {System.out.println(error);}
	}
}
然後直接進行打包的動作。
mvn clean package;
然後這時候可以打開這個Jar包來觀察一下,看一下我們的檔案究竟是否有被打包進去。
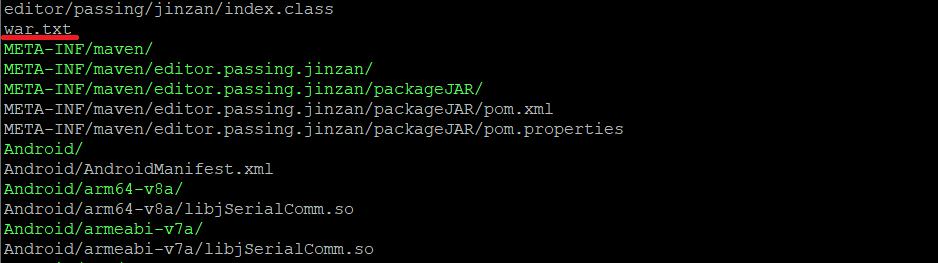
若此文字文件放在多個資料夾底下,那這邊也會相對應的出現完整的路徑,而出現的這個路徑即是我們在 Java 程式中需填入檔案路徑。
所以,如果不清楚檔案路徑要怎麼填寫也可以使用此方式來查看。
至此,我們已經成功拿到了檔案的路徑,接下來只要簡單的做開檔和讀檔的動作即可:
import java.io.IOException;
import java.io.InputStream;
import java.lang.ClassLoader;
import java.io.BufferedReader;

public class index
{
	public static void main(String[] args)
	{
		try
		{
			ClassLoader classloader = Thread.currentThread().getContextClassLoader();
			InputStream file = classloader.getResourceAsStream("war.txt");
			BufferedReader reader = new BufferedReader(new InputStreamReader(file));

			while(reader.ready())
			{
				String content = new String(reader.readLine());
				System.out.println(content);
			}

			file.close();
		}
		catch(IOException error) {}
	}
}
剩下的事情就簡單啦,直接執行 Jar 包,程式會自行開始讀取檔案的。
java -jar .\target\packageJAR-1.0.0.jar
後記
使用 Maven 將文字文件打包進 Jar 的最大好處就是封裝,簡單來說,別人只能知道你夾帶了這個文件,而無法輕易獲取此檔案內容啦~
至少比把文字文件和 Jar 檔放在同一個資料夾下直接寄給對方還要隱密,說不定對方用了很久你寫的 Jar 檔都不知道原來在裡面還有個神奇的文字文件。
