自動目錄
- 安裝
- 一、註冊一個帳號
- 二、建立一個儲存庫
- 三、Linux中操作
- 四、建立分枝 branch
- 五、使用github
- 六、在本地複製自己的repos.
- 七、在不使用GITHUB自建GIT server[3]
- 八、移除及記錄
- 錯誤
- 結語
- 感謝
- 參考資料
有寫程式的人在網路上找資料時,常常會看到檔案是放在Github https://github.com/ 上,看起來很專業很高級,這是不是要花錢?是不是任何人都能放?答案是有免費的,而且是任何人都能放,這篇告訴你怎麼做。
安裝
請參考windows, linux, freebsd 下安裝git 這篇或官網[1]
一、註冊一個帳號
到github 註冊一個帳號,並完成email的認證程序,這個步驟和大部分的站台註冊程序差不多。
二、建立一個儲存庫
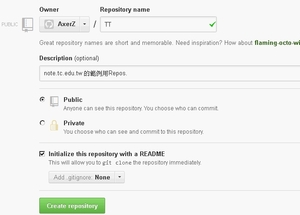
登入後點選右上角新增一個repository(把他想像成一個db就好,外國人常簡寫成repos.)
填寫你的repos. name 名稱,不要用中文,未來會是一個連結,存取類別有public和private兩種,免費的只能使用public,private是付費版本:
public 你的所有的文件在網路上所有人都能看見和下載,但只有你授權的人能修改
private 只有你選擇的人能看見和修改你上傳的檔案,限付費帳號,1個月的費用是US$7
最下面的initialize the repository with a README 打勾後,系統會幫你建一個 README.md 檔,github會把他當成是此儲存庫的預設說明。如果你想把你現有的專案上傳的話,就不要勾,以免到時還要多處理這個檔。
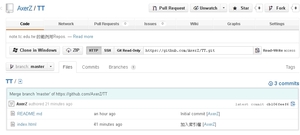
這樣就會產生一個你專屬的git,https://github.com/[你的名稱]/[你的儲存庫].git,此例 https://github.com/AxerZ/TT.git
你會發現整個儲存庫會有一個README.md 下面會顯示他的內容。
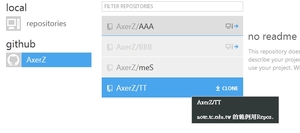
如果是用WINDOWS版本,就會看到你建立的儲存庫了
三、Linux中操作
1. 假設我現在要開始在 /home/axer/public_html/TT/ 中寫一個專案,先要git初始化
$ cd /home/axer/public_html/TT/
$ git init
Initialized empty Git repository in /home/axer/public_html/TT/.git/
2. 在本地設定自己的帳戶
$ git config --global user.email "axer@tc.edu.tw"
$ git config --global user.name "AxerZ"
3. 開始編輯檔案,例如新增的一個index.html (或是你可以從別的地方拷檔案到這個目錄來)
$ touch index.html
把index.html 加到你的舞台中(等於加入清單的意思)
$ git add index.html
要移出舞台用reset
$ git reset HEAD index.html
隨時用 status 查看舞台中的檔案
$ git status
把他送進 repos. 中,-m 參數後面帶的是此次更新的註解
$ git commit index.html -m '加入索引檔'
接下來如果不心心把index.html 刪掉,要回復的話就使用checkout ,後面那個 '.' 代表所有的檔案
$ rm index.html
$ git checkout .
查看可以清除的untracked 的檔案
$ git clean -n
清除可以清除的untracked 的檔案
$ git clean -f 檔案或目錄
回覆原本的目錄,包括新增的檔案,清除所有未追蹤的(untracked)檔案[6]
$ git clean -xdf
其他的操作可以參考[2]的說明,非常的詳細
4. 到目前為止,都還只是本地端的操作,接下來要把檔案上傳到 github
加一個遠端 github repos. 名稱可以自取,此例myTT
$ git remote add myTT https://github.com/AxerZ/TT.git
把本地的檔案推到遠端的myTT中,master 這個分枝
$ git push myTT master
(gnome-ssh-askpass:2201): Gtk-WARNING **: cannot open display:
error: unable to read askpass response from '/usr/libexec/openssh/gnome-ssh-askpass'
Username for 'https://github.com': AxerZ
(gnome-ssh-askpass:2205): Gtk-WARNING **: cannot open display:
error: unable to read askpass response from '/usr/libexec/openssh/gnome-ssh-askpass'
Password for 'https://AxerZ@github.com':
To https://github.com/AxerZ/TT.git
! [rejected] master -> master (non-fast-forward)
error: failed to push some refs to 'https://github.com/AxerZ/TT.git'
hint: Updates were rejected because the tip of your current branch is behind
hint: its remote counterpart. Merge the remote changes (e.g. 'git pull')
hint: before pushing again.
hint: See the 'Note about fast-forwards' in 'git push --help' for details.
出現上面的錯誤,主要因為遠端repos.和本地的檔案清單不一致,還記得建repos.上面多一個README.md在本地的repos.是沒有的,因此要先把他拉回來合併:
$ git pull myTT master
From https://github.com/AxerZ/TT
* branch master -> FETCH_HEAD
Merge made by the 'recursive' strategy.
README.md | 4 ++++
1 file changed, 4 insertions(+)
create mode 100644 README.md
5. 把他推到 github
$ git push myTT master
(gnome-ssh-askpass:2339): Gtk-WARNING **: cannot open display:
error: unable to read askpass response from '/usr/libexec/openssh/gnome-ssh-askpass'
Username for 'https://github.com': AxerZ
(gnome-ssh-askpass:2341): Gtk-WARNING **: cannot open display:
error: unable to read askpass response from '/usr/libexec/openssh/gnome-ssh-askpass'
Password for 'https://AxerZ@github.com':
Counting objects: 6, done.
Delta compression using up to 16 threads.
Compressing objects: 100% (3/3), done.
Writing objects: 100% (5/5), 512 bytes, done.
Total 5 (delta 0), reused 0 (delta 0)
To https://github.com/AxerZ/TT.git
39c84d4..cb106fe master -> master
再去github 重新整理,就會發現你的 index.html已經上去了
四、建立分枝 branch
設定分枝 名稱"2nd"
$ git branch 2nd
切換到 "2nd" 這個分枝
$ git checkout 2nd
Switched to branch '2nd'
假設在這個分枝加入一個檔案 2ndtest.html,並送出
$ touch 2ndtest.html
$ ls
2ndtest.html index.html README.md
$ git add 2ndtest.html
$ git commit 2ndtest.html -m '2nd加入檔"
$ git push myTT 2nd
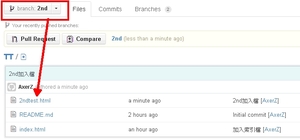
再查看github,檔案已經送過去,而且多了一個分枝可以選擇
查看分枝
建立一個新分枝note2,並使用其中第<commit hash>的commit
移除一個branch note2[8]
更名branch [9]
五、使用github
已經上傳上去的檔案,如果要在另一個地方下載下來使用
$ git clone -b 2nd https://github.com/AxerZ/TT.git 2ndTT
這樣就會把https://github.com/AxerZ/TT.git 上分枝2nd的檔案,複製一份下載下來到 2ndTT的目錄中。
$ cd 2ndTT/
建立新檔 new.html
$ touch new.html
$ git add new.html
$ git commit new.html -m 'new'
[2nd 07fef1a] new
0 files changed
create mode 100644 new.html
刪除已加入的檔案
先刪除該檔
$ rm path/to/yourfile_or_dir
從git的索引中移除
$ git rm path/to/yourfile_or_dir
推到git hub
$ git push
如此就能隨時隨地更新你的github
六、在本地複製自己的repos.
上面教的是採用網路的GITHUB進行版本控制,但如果是要在local自己CLONE自己的repos要怎麼做:
很簡單只要指定另一個複本的位置即可
$ git clone /home/axer/public_html/TT/
七、在不使用GITHUB自建GIT server[3]
[SERVER端]
GIT可以使用SSH的協定更新,這樣提供了很大的彈性,假若SERVER檔案庫要建在自己家目錄中,則先在自己的家目錄下建一個目錄 git:
$ mkdir git
$ cd git
建立一個git的repos. 假設這個名稱叫 heart.git,記得加入參數 --bare 不建.git目錄,而把裡面的檔案直接放在目前目錄下[4],這樣才能當SERVER
$ git --bare init heart.git
[開發端]::把寫好的程式丟到server
client 端的作法就和三.4、三.5相同,先建遠端stage:
$ cd /path/to/your/project
$ git init
$ git remote add HeartTT ssh://axer@163.17.38.84/~/git/heart.git/
把本地端檔案加入清單
$ git add .
$ git commit -m '註解'
最後,把client端的檔案推到server中吧
$ git push HeartTT master
axer@163.17.38.84's password:
Counting objects: 8, done.
Delta compression using up to 16 threads.
Compressing objects: 100% (4/4), done.
Writing objects: 100% (8/8), 729 bytes, done.
Total 8 (delta 0), reused 0 (delta 0)
To ssh://axer@163.17.38.84/~/git/heart.git/
* [new branch] master -> master
[客戶端CLIENT]::把server端的程式拿來來用
$ git clone ssh://axer@163.17.38.84/~/git/heart.git/ /path/to/
這樣就能直接用了
未來更新
$ git pull HeartTT master
八、移除及記錄
如果一個目錄已經 git init過,要怎麼移除它?很簡單,只要到根目錄把那個 .git 的隱藏檔刪掉即可。
查看更新記錄
$ git log
commit f09a149382b74d021f8abf0488d18f94e9f57117
Author: AxerZ <root@pid1.sso.edu.tw>
Date: Mon Jul 17 00:16:34 2017 +0800
mod ReadME
commit ee690dbb72bb979b20aa39f5be20e99c0326614c
Author: AxerZ <root@pid1.sso.edu.tw>
Date: Mon Jul 17 00:06:25 2017 +0800
add main files
...
查看異動記錄
$ git show <COMMIT_ID>
# git show 2a877b0a506ad0d0ce3e3486b6143f292f30e99b
回復
回復到其中的第X次更新,後面接著checkout 上的流水號
$ git checkout f09a149382b74d021f8abf0488d18f94e9f57117
只回復某一個檔案到某一個流水號
$ git checkout b0f50343bb911b59e30156729104cac2c80cb657 Management.php
回復不小心刪除的某目錄
$ git checkout path/
放棄最後一次更新
$ git revert HEAD
如果要強制遠端放棄最後一個版號,下指令
$ git git push logTT +ad7679ef33aff2230d3a413db0376a08b55e266b^:master
其中ad7679ef33aff2230d3a413db0376a08b55e266b是最後一個commit hash號,要被放棄的,而logTT是達端的repos.,請參考上面三、5的說明
如果本地有回復到某一個commit hash,要遠端也同步的話,下指令
$ git reset HEAD^ --hard
$ git push logTT -f
錯誤
出現無法操作錯誤,刪除 index.lock 後重試
fatal: Unable to create '/home/ddns/.git/index.lock': File exists.
似乎另外一個 git 進程在這個版本庫中執行,例如:'git commit' 指令打開了一個編輯器。請確認所有進程都已經關閉然後重試。如果仍然報錯,可能之前有一個 git 進程在這個版本庫中異常離開:手動刪除這個檔案再繼續。[11]
# rm -f .git/index.lock
The following untracked working tree files would be overwritten by merge
試著清除本地的未追蹤檔
Git 2.11 and newer versions:
Older versions of Git:
-x ignored files are also removed as well as files unknown to Git.
-d remove untracked directories in addition to untracked files.
-f is required to force it to run.
結語
與其說 git是分散式的版本控制,不如說他是集中式+分散式的,和subversion比起來,sv可以建立免費的私人的server,為client-server架構,反而比較像分散式的。但是git對於分枝的支援,及集中的空間讓大家分享檔案,是相當不錯的特色。
感謝
台中教網中心陳瑩光提出的需求和指導
參考資料
[1] https://help.github.com/articles/set-up-git
[2] http://blog.gogojimmy.net/2012/01/17/how-to-use-git-1-git-basic/
http://blog.gogojimmy.net/2012/02/29/git-scenario/
[3] http://littlebmix.blogspot.tw/2011/02/git-server-ubuntu-linux.html
[4] http://blog.xuite.net/yctseng/notes/35377315-git-init
[5] GITHUB API V3 http://developer.github.com/v3/
[6] http://stackoverflow.com/questions/1090309/git-undo-all-working-dir-changes-including-new-files
[7] http://christoph.ruegg.name/blog/git-howto-revert-a-commit-already-pushed-to-a-remote-reposit.html
[8] https://makandracards.com/makandra/621-git-delete-a-branch-local-or-remote
[9] https://stackoverflow.com/questions/6591213/how-do-i-rename-a-local-git-branch
[11] https://stackoverflow.com/questions/16602544/fatal-unable-to-create-git-index-lock-file-exists
原文 2013-04-13 12:53:33


