自動目錄
這次的任務是安裝 gitlab ,比較特別的是因為同一台機器已有網頁的服務,所以利用 nginx當作proxy 轉到內部的 gitlab 網頁。
安裝使用docker 來安裝,非常方便。
DOCKER COMPOSE
gitlab 的compose 設定
gitlab:
image: gitlab/gitlab-ce:latest
restart: always
container_name: gitlab
environment:
GITLAB_OMNIBUS_CONFIG: |
external_url 'http://gitlab.sfs.tw'
gitlab_rails['gitlab_shell_ssh_port'] = 2222
volumes:
- ./gitlab/data:/var/opt/gitlab
- ./gitlab/logs:/var/log/gitlab
- ./gitlab/config:/etc/gitlab
ports:
- "2222:22"
以上的設置中,作業系統的22埠已被ssh占用,container的22埠就指到作業系統的2222埠。
gitlab預設會聆聽 80及443 ,不必另外設置。
預設的對外url要指定,這裡採用http協定,如果你有憑證也可以改成https。
因為同一台伺服器已有網頁的服務,我又不想用非標準埠來提供gitlab的網頁服務,所以透過nginx來作proxy
image: nginx:latest
container_name: nginx
ports:
- "80:80"
volumes:
- ./conf/conf.d:/etc/nginx/conf.d/:ro
restart: always
以上空間指到目錄下的 ./conf/conf.d/ ,在其中建立一個檔案virtual,nginx啟動時會自動讀取該檔的設置。
listen 80;
listen [::]:80;
server_name gitlab.sfs.tw;
location / {
proxy_set_header X-Real-IP $remote_addr;
proxy_set_header X-Forwarded-For $remote_addr;
proxy_set_header Host $host;
proxy_pass http://gitlab:80/;
}
}
如果你是https,80修改為443並放入憑證即可,例如這樣(僅供參考):
server {
listen 443 ssl http2;
listen [::]:443 ssl http2;
...
ssl_certificate /etc/nginx/conf.d/your_full_chain.crt;
ssl_certificate_key /etc/nginx/conf.d/your_private.key;
ssl_prefer_server_ciphers on;
ssl_protocols TLSv1.2;
ssl_ciphers "EECDH+ECDSA+AESGCM EECDH+aRSA+AESGCM EECDH+ECDSA+SHA384 EECDH+ECDSA+SHA256 EECDH+aRSA+SHA384 EECDH+aRSA+SHA256 EECDH+aRSA+RC4 EECDH EDH+aRSA !aNULL !eNULL !LOW !3DES !MD5 !EXP !PSK !SRP !DSS !RC4";
}
重啟docker生效。
進到網頁
進到你設定的網址 http://gitlab.sfs.tw/
登入帳號是 root,密碼放在你的設定檔 /etc/gitlab/initial_root_password中。
# sudo docker exec -it gitlab grep 'Password:' /etc/gitlab/initial_root_password
把那串長長的貼入即可
建立管理帳號
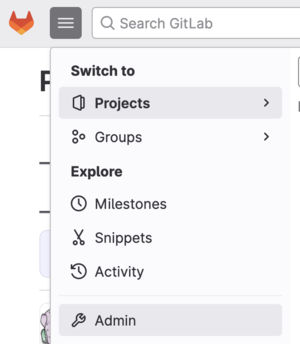
左上角三條線點一下,選Admin
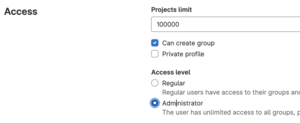
root要修改密碼以免被別人用root登入(因為都從github的images),並建立一個管理帳號,其中Access level 設為Administrator。
修改語系
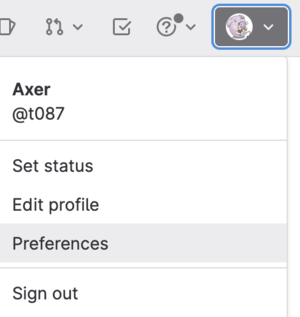
預設是英文,你可以選擇數十總語言,右上角的頭像-> Preferences ->
左邊的選單 Reference ->Localization ->Language
測試
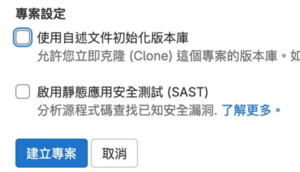
建立一個專案後,下面這兩個不要勾
依指示設定你的帳號資料
$ cd /path/to/yourdirectory
$ git config --global user.name "你的名字"
$ git config --global user.email "你的email"
初始化你的專案並加入遠端資源埠
$ git init --initial-branch=main
$ git remote add origin http://gitlab.sfs.tw/username/test.git
加入檔案到git清單中
$ git add .
$ git commit -m "Initial commit"
$ git push -u origin main
測試ok
參考資料
[1] https://ithelp.ithome.com.tw/articles/10211148
[2] https://hub.docker.com/r/gitlab/gitlab-ce


