
自動目錄
說真的很複雜,沒有基礎做來痛苦,此篇僅供記錄.
系統
CentOS7 最小安裝的環境,要建立IDP伺服器
一、基本安裝
1. 安裝基本套件
2. 設定語系,如果有需要的話(例如中文字亂碼)
3. 安裝 mongo, mariadb
內容如下
[mongodb-org-3.4]
name=MongoDB Repository
baseurl=https://repo.mongodb.org/yum/redhat/$releasever/mongodb-org/3.4/x86_64/
gpgcheck=1
enabled=1
gpgkey=https://www.mongodb.org/static/pgp/server-3.4.asc
# yum install mariah mariadb-server -y
二、安裝 java
下載 Server JRE (v-8u144) http://www.oracle.com/technetwork/java/javase/downloads/server-jre8-downloads-2133154.html
Server JRE (v-8u181) http://www.oracle.com/technetwork/java/javase/downloads/server-jre8-downloads-2133154.html
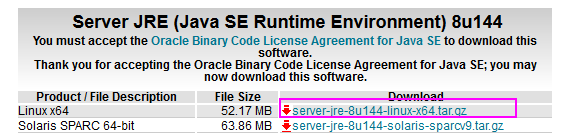
上傳後解壓且搬移
# tar zxvf server-jre-8u144-linux-x64.tar.gz
# mv jdk1.8.0_144/ /opt/jdk8
三. 安裝 wildfly
1. 下載頁面 http://wildfly.org/downloads/ 選擇TGZ,版本找最新的(150mb左右)
2. 解壓
# mv wildfly-13.0.0.Final/ /opt/wildfly
3. 設定服務
# vim /etc/default/wildfly.conf
內容如下:
JAVA_HOME="/opt/jdk8"
JBOSS_HOME="/opt/wildfly"
JBOSS_USER=wildfly
JBOSS_MODE=standalone
JBOSS_CONFIG=standalone.xml
STARTUP_WAIT=60SHUTDOWN_WAIT=60
JBOSS_CONSOLE_LOG="/var/log/wildfly/console.log"
JBOSS_OPTS="-b 127.0.0.1"
4. 啟動設定
修改設定檔 vi /etc/init.d/wildfly 把前面修改為
# Source function library.
. /etc/init.d/functions
# Load Java configuration.
# 加入3行
[ -r /etc/java/java.conf ] && . /etc/java/java.conf
export JAVA_HOME
NAME=$(basename ${0})
# 這行註解
# NAME=$(readlink -f ${0} | xargs basename)
# 修改增加 .conf
# Load wildfly init.d configuration.
if [ -z "$JBOSS_CONF" ]; then
JBOSS_CONF="/etc/default/${NAME}.conf"
fi
# 其餘不變
# chown -R wildfly:wildfly /opt/wildfly
# mkdir /var/log/wildfly
# chown -R wildfly:wildfly /var/log/wildfly
5. 設定別名 vi /etc/profile 最上面加入
export JAVA_HOME="/opt/jdk8"
export PATH=$JAVA_HOME/bin:$PATH
6. 第一次啟動 wildfly
重設服務
# systemctl daemon-reload
開機啟動
# systemctl enable wildfly
啟動
# systemctl start wildfly
7. 觀察服務啟動狀態
觀察三個連線LISTEN
LISTEN 0 128 127.0.0.1:8443 *:*
LISTEN 0 50 127.0.0.1:9990 *:*
四、設定防火牆和SELINUX
1. 防火牆
# firewall-cmd --add-service=http --permanent
# firewall-cmd --add-service=https --permanent
重啟
# service firewalld restart
2. selinux
# setsebool -P httpd_can_network_connect_db on
# setsebool -P httpd_can_network_connect on
3. 預留未來 Load Balancing
# semanage port -a -t http_port_t -p tcp 6666
4. 加入 Shared Memory Table
# chcon -v --type=httpd_cache_t /var/cache/mod_cluster
# chcon -v --user=system_u /var/cache/mod_cluster
五、設定 APACHE + MOD_CLUSTER
這個作法是把APACHE當前端,後端proxy轉給wildfly
1. 下載JBOSS so檔
下載頁 http://mod-cluster.jboss.org/mod_cluster/downloads/1-3-1-Final-bin
下載
# tar zxvf mod_cluster-1.3.1.Final-linux2-x64-so.tar.gz
# mv *.so /usr/lib64/httpd/modules/
# cp *.so /etc/httpd/modules/
2. 加入模組
# vi /etc/httpd/conf.modules.d/02-modcluster.conf
內容
LoadModule manager_module modules/mod_manager.so
LoadModule proxy_cluster_module modules/mod_proxy_cluster.so
LoadModule advertise_module modules/mod_advertise.so
3. 關掉原來的 proxy
vi /etc/httpd/conf.modules.d/00-proxy.conf
把下面這行註解
4. 設定httpd.conf
vi /etc/httpd/conf/httpd.conf
5. 加入wildfly.conf
# cd /etc/httpd/conf.d/
# mv ssl.conf ssl.conf.bakvi /etc/httpd/conf.d/wildfly.conf
MemManagerFile /var/cache/mod_cluster
#Listen 443 https
RewriteEngine On
# This will enable the Rewrite capabilities
RewriteCond %{HTTPS} !=on
# This checks to make sure the connection is not already HTTPS
<VirtualHost *:80>
DocumentRoot /var/www/html
ServerName oidc.xx.edu.tw
<Directory "/var/www/html">
Options -Indexes
AllowOverride All
Require all granted
</Directory>
# RewriteCond %{HTTPS} off
# RewriteRule (.*) https://%{SERVER_NAME}/$1 [R,L]
</VirtualHost>
ServerName oidc.xx.edu.tw 請修改
倒數二行是讓HTTP自動轉址到HTTPS,請先註解,或刪除
5. 啟動APACHE
# systemctl start httpd
六、申請免費的SSL
先確認你的APACHE有正常啟動,打開你的網頁連到你的網址。
安裝
Saving debug log to /var/log/letsencrypt/letsencrypt.log
Plugins selected: Authenticator apache, Installer apache
Enter email address (used for urgent renewal and security notices) (Enter 'c' to
cancel): user@example.com
Starting new HTTPS connection (1): acme-v01.api.letsencrypt.org
-------------------------------------------------------------------------------
Please read the Terms of Service at
https://letsencrypt.org/documents/LE-SA-v1.1.1-August-1-2016.pdf. You must agree
in order to register with the ACME server at
https://acme-v01.api.letsencrypt.org/directory
-------------------------------------------------------------------------------
(A)gree/(C)ancel: a
-------------------------------------------------------------------------------
Would you be willing to share your email address with the Electronic Frontier
Foundation, a founding partner of the Let's Encrypt project and the non-profit
organization that develops Certbot? We'd like to send you email about EFF and
our work to encrypt the web, protect its users and defend digital rights.
-------------------------------------------------------------------------------
(Y)es/(N)o: y
Starting new HTTPS connection (1): supporters.eff.org
-------------------------------------------------------------------------------
1: n.sfs.tw
-------------------------------------------------------------------------------
Select the appropriate numbers separated by commas and/or spaces, or leave input
blank to select all options shown (Enter 'c' to cancel): 1
Obtaining a new certificate
Performing the following challenges:
tls-sni-01 challenge for n.sfs.tw
Waiting for verification...
Cleaning up challenges
Created an SSL vhost at /etc/httpd/conf.d/wildfly-le-ssl.conf
Deploying Certificate for n.sfs.tw to VirtualHost /etc/httpd/conf.d/wildfly-le-ssl.conf
Please choose whether or not to redirect HTTP traffic to HTTPS, removing HTTP access.
-------------------------------------------------------------------------------
1: No redirect - Make no further changes to the webserver configuration.
2: Redirect - Make all requests redirect to secure HTTPS access. Choose this for
new sites, or if you're confident your site works on HTTPS. You can undo this
change by editing your web server's configuration.
-------------------------------------------------------------------------------
Select the appropriate number [1-2] then [enter] (press 'c' to cancel): 2
Redirecting vhost in /etc/httpd/conf.d/wildfly.conf to ssl vhost in /etc/httpd/conf.d/wildfly-le-ssl.conf
-------------------------------------------------------------------------------
Congratulations! You have successfully enabled https://n.sfs.tw
You should test your configuration at:
https://www.ssllabs.com/ssltest/analyze.html?d=n.sfs.tw
-------------------------------------------------------------------------------
IMPORTANT NOTES:
- Congratulations! Your certificate and chain have been saved at:
/etc/letsencrypt/live/oidc.boe.ttct.edu.tw/fullchain.pem
Your key file has been saved at:
/etc/letsencrypt/live/oidc.boe.ttct.edu.tw/privkey.pem
Your cert will expire on 2017-12-25. To obtain a new or tweaked
version of this certificate in the future, simply run certbot again
with the "certonly" option. To non-interactively renew *all* of
your certificates, run "certbot renew"
- If you like Certbot, please consider supporting our work by:
Donating to ISRG / Let's Encrypt: https://letsencrypt.org/donate
Donating to EFF: https://eff.org/donate-le
這樣你的 wildfly.conf 會多出這幾行
RewriteCond %{SERVER_NAME} =oidc.boe.ttct.edu.tw
RewriteRule ^ https://%{SERVER_NAME}%{REQUEST_URI} [END,NE,R=permanent]
並多一個檔案wildfly-le-ssl.conf
七、修改proxy到wildfly
vi /etc/httpd/conf.d/wildfly-le-ssl.conf
加入這些:
ProxyPreserveHost On
AllowEncodedSlashes NoDecode
<Location /mcm>
SetHandler mod_cluster-manager
Order deny,allow
Deny from all
Allow from ip 211.75.194.240/29
</Location>
<Location />
ProxyPass "http://127.0.0.1:8080/"
ProxyPassReverse "http://127.0.0.1:8080/"
Order deny,allow
Allow from all
CreateBalancers 0
</Location>
全部看起來是這樣的:

重啟APACHE和WILDFLY
# systemctl restart httpd
下一篇建構程式
