
自動目錄
我原始的VM檔很小,只有40GB,在複製後若要擴大空間,可以經由設定完成
一、選擇要擴容的VM
先關機,右鍵選擇「編輯設定」

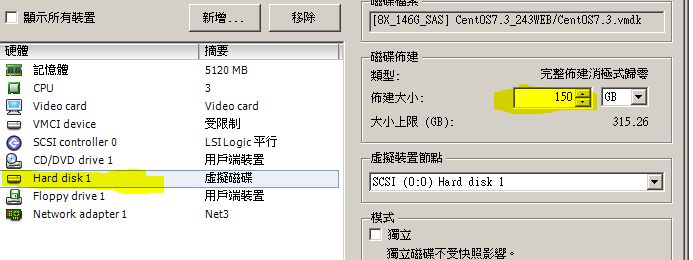
二、修改容量
左邊選擇 「Hard disk x」->調整大小->按確定,並啟動系統
OS
CentOS Linux release 7.3.1611 (Core)
三、建立分割區
原本的容量是40GB,並不會因為你擴容而改變
# df -h
檔案系統 容量 已用 可用 已用% 掛載點
/dev/mapper/cl-root 37G 1021M 36G 3% /
devtmpfs 2.4G 0 2.4G 0% /dev
tmpfs 2.4G 0 2.4G 0% /dev/shm
tmpfs 2.4G 8.5M 2.4G 1% /run
tmpfs 2.4G 0 2.4G 0% /sys/fs/cgroup
/dev/sda1 1014M 139M 876M 14% /boot
tmpfs 480M 0 480M 0% /run/user/0
要手動調整,查看
# fdisk -l
Disk /dev/sda: 161.1 GB, 161061273600 bytes, 314572800 sectors <==sda全部空間
Units = sectors of 1 * 512 = 512 bytes
Sector size (logical/physical): 512 bytes / 512 bytes
I/O 大小 (最小/最佳化):512 位元組 / 512 位元組
Disk label type: dos
磁碟識別碼:0x000e95e2
所用裝置 開機 開始 結束 區塊 識別號 系統
/dev/sda1 * 2048 2099199 1048576 83 Linux
/dev/sda2 2099200 83886079 40893440 8e Linux LVM
Disk /dev/mapper/cl-root: 39.7 GB, 39720058880 bytes, 77578240 sectors <==目前區塊空間
Units = sectors of 1 * 512 = 512 bytes
Sector size (logical/physical): 512 bytes / 512 bytes
I/O 大小 (最小/最佳化):512 位元組 / 512 位元組
Disk /dev/mapper/cl-swap: 2147 MB, 2147483648 bytes, 4194304 sectors
Units = sectors of 1 * 512 = 512 bytes
Sector size (logical/physical): 512 bytes / 512 bytes
I/O 大小 (最小/最佳化):512 位元組 / 512 位元組
先建立主要磁區(Linux LVM磁區)
# fdisk /dev/sda
Disk /dev/sda: 161.1 GB, 161061273600 bytes, 314572800 sectors
Units = sectors of 1 * 512 = 512 bytes
Sector size (logical/physical): 512 bytes / 512 bytes
I/O 大小 (最小/最佳化):512 位元組 / 512 位元組
Disk label type: dos
磁碟識別碼:0x000e95e2
所用裝置 開機 開始 結束 區塊 識別號 系統
/dev/sda1 * 2048 2099199 1048576 83 Linux
/dev/sda2 2099200 83886079 40893440 8e Linux LVM
預設會有 sda1, sda2
Partition type:
p primary (2 primary, 0 extended, 2 free)
e extended
Select (default p): p
分割區編號 (3,4, default 3): 3
起初 sector (83886080-314572799, 預設 83886080):<按ENTER>
使用預設值 83886080
最後 sector, +sectors 或 +大小{K,M,G} (83886080-314572799, 預設 314572799):<按ENTER>
使用預設值 314572799
Partition 3 of type Linux and of size 110 GiB is set
命令 (m 以獲得說明):t
分割區編號 (1-3, default 3): 3
Hex code (type L to list all codes): 8e <可按L查看partition type,輸入8e後按ENTER>
Changed type of partition 'Linux' to 'Linux LVM'
命令 (m 以獲得說明):w
分割表已變更!
呼叫 ioctl() 以重新讀取分割表。WARNING: Re-reading the partition table failed with error 16: 裝置或系統資源忙碌中.
The kernel still uses the old table. The new table will be used at
the next reboot or after you run partprobe(8) or kpartx(8)
同步磁碟。
查看是否建立成功
# fdisk -l
Disk /dev/sda: 161.1 GB, 161061273600 bytes, 314572800 sectors
Units = sectors of 1 * 512 = 512 bytes
Sector size (logical/physical): 512 bytes / 512 bytes
I/O 大小 (最小/最佳化):512 位元組 / 512 位元組
Disk label type: dos
磁碟識別碼:0x000e95e2
所用裝置 開機 開始 結束 區塊 識別號 系統
/dev/sda1 * 2048 2099199 1048576 83 Linux
/dev/sda2 2099200 83886079 40893440 8e Linux LVM
/dev/sda3 83886080 314572799 115343360 8e Linux LVM
重開機
四、加入
把裝置加入物理容積(Physical Volume)中
# pvcreate /dev/sda3
Physical volume "/dev/sda3" successfully created.
查看我的容積群(Volume Group),注意我的VG name是"cl"而不是" VolGroup00"
# vgdisplay
--- Volume group ---
VG Name cl
System ID
Format lvm2
Metadata Areas 1
Metadata Sequence No 3
VG Access read/write
VG Status resizable
MAX LV 0
Cur LV 2
Open LV 2
Max PV 0
Cur PV 1
Act PV 1
VG Size 39.00 GiB
PE Size 4.00 MiB
Total PE 9983
Alloc PE / Size 9982 / 38.99 GiB
Free PE / Size 1 / 4.00 MiB
VG UUID j2Krvn-2RNI-RtVt-BcId-fkPX-SZ1l-2j3XCu
延伸物理容積到容積群
# vgextend cl /dev/sda3
Volume group "cl" successfully extended
再查看我的物理容積
# vgdisplay cl
--- Volume group ---
VG Name cl
System ID
Format lvm2
Metadata Areas 2
Metadata Sequence No 4
VG Access read/write
VG Status resizable
MAX LV 0
Cur LV 2
Open LV 2
Max PV 0
Cur PV 2
Act PV 2
VG Size 148.99 GiB
PE Size 4.00 MiB
Total PE 38142
Alloc PE / Size 9982 / 38.99 GiB
Free PE / Size 28160 / 110.00 GiB
VG UUID j2Krvn-2RNI-RtVt-BcId-fkPX-SZ1l-2j3XCu
紅字部分注意一下,目前有多的110GB容積閒置
延伸邏輯容積,110G是我要延伸的大小
# lvextend -L+110G /dev/cl/root
Size of logical volume cl/root changed from 36.99 GiB (9470 extents) to 146.99 GiB (37630 extents).
Logical volume cl/root successfully resized.
動態增加容積,依系統不同試看下面幾個指令
# ext2online /dev/cl/root
-bash: ext2online:命令找不到
# resize2fs /dev/cl/root
resize2fs 1.42.9 (28-Dec-2013)
resize2fs: Bad magic number in super-block while trying to open /dev/cl/root
Couldn't find valid filesystem superblock.
# xfs_growfs /dev/cl/root
meta-data=/dev/mapper/cl-root isize=512 agcount=4, agsize=2424320 blks
= sectsz=512 attr=2, projid32bit=1
= crc=1 finobt=0 spinodes=0
data = bsize=4096 blocks=9697280, imaxpct=25
= sunit=0 swidth=0 blks
naming =version 2 bsize=4096 ascii-ci=0 ftype=1
log =internal bsize=4096 blocks=4735, version=2
= sectsz=512 sunit=0 blks, lazy-count=1
realtime =none extsz=4096 blocks=0, rtextents=0
data blocks changed from 9697280 to 38533120
查看
# df -h
檔案系統 容量 已用 可用 已用% 掛載點
/dev/mapper/cl-root 147G 1022M 146G 1% /
重開機,完成擴容
